On the frontlines – teaching students; teaching teachers. A source for EdTech tips, tricks, and solutions.

Friday, August 7, 2015

Google Classroom Home Screen Organization

If you are like me and have several classes set up in Google Classroom, it's really convenient to have your Home/Dashboard set up in a way that makes sense to you. For me, I like to have my class cards go in chronological order of my school day (Periods 1-7).

The problem with this is that once you have classes created, you can't reorder the cards in your home screen of Google Classroom.

Solution #1 - Create classes in a specific order:

As you create your classes, think about how want your Home/Dashboard arranged.  If you want your class cards to show up in a certain order, create your classes so that the class you want to appear last is created first. 
In the picture above, you'll notice that I ordered my classes by their section, not by the class name. In this arrangement, I created my period 7 class first so that it would end up at the end of my cards. 

What if I have shared classes?

If you are sharing your classes with another teacher (or yourself in a whitelisted approved domain), you will need to add the co-teacher as you create each class in order to keep the arrangement that you desire. If you have created all of your classes and go to add a co-teacher, the cards will not be organized on the other teacher's end. 

The bottom line: think about how you want things to appear before you begin creating classes. 

Solution #2 - Using Bookmarks:

If you have already set up your classes in Classroom, there isn't much that you can do to organize your cards. However, there is a workaround. Before I realized how to create classes in the order I wanted, I used bookmarks to keep my Google Classroom workflow easy. 

If you click on a card and open one of your classes, it has a unique URL that you can bookmark. When you bookmark this class, you can edit the name that shows up on your bookmark. Make it as specific or as short as you want. See image below:


If you want, you can put all of your bookmarks in a folder to free up space on your bookmarks bar. 


Friday, May 22, 2015

Becoming a Master of Data Overlords

With all of the assessment data that we as teachers collect over the course of the school year, keeping track of everything can seem very daunting. If you are collecting data in your GAFE account, here is an easy way to make a report that will isolate one student at a time. You can set this up for a grade book, monitoring progress during a unit, or any other reason you would collect data from your students.

Almost every time you would export data about your student, it shows up in a spreadsheet the same way: student names going down the left side in rows and different data sets going across the columns. 

Even if you lock down the first row with the student's name, you still have a lot of data on the spreadsheet. It can seem overwhelming. Follow along to create a isolated, vertical report that is easy to view. 

 Watch the video below or follow the step by step guide below to create this report

Video Walkthrough:


Walkthrough

  • Step 1: Open up a sheet with all of your student data. 
  • Step 2: Create a new sheet by hitting the plus button on the bottom left of the spreadsheet window. 
  • Step 3: Always rename your new sheets to keep track of things: I've renamed mine Student Reports

  • Step 4: If you want, delete all of the extra rows and columns that you won't need (I only needed 3 columns for my reports.

Adding a Drop-down menu in Google Sheets:

    • Right click on the cell in which you'd like the dropdown menu (I chose C1)
    • Select Data Validation
    • Where it says Criteria, select the range from your original sheet that contains student names
    • Click save

Transpose Function:


  • The transpose function in Sheets allows you to take the horizontal data, and flip it to vertical. 
  • The transpose function should look like this: =TRANSPOSE(array_or_range) 
    • If you are using a separate sheet, remember to add the sheet name (exactly as it typed) and an ! to denote the sheet. Sample: =TRANSPOSE(Sheet1!A1:AJ2)
  • Put in your Transpose function in cell A2 - Now you see my assessment titles listed vertically below.


Filter Function:

  • Now that we have the assessment names and headers inputted as a vertical report, now we need to populate the data from individual students. We will have to use the filter function in conjunction with the transpose function. 
  • The filter function allows us to select all of the data we want to filter from, then we create a condition that will show us anything that relates to the criteria we selected. 
  • We need to not only create a filter, but we also need to transpose it so that it follows the format of the previously created vertical layout. 
  • We are going to put this in cell C2 (Sheet names match the sample in the images above)

Now when you select a name in the dropdown menu, the data sets change based on whatever name shows up in C1. 

To make it even better, add some conditional formatting to the cells to give you a quick glance look at how students are progressing. 


Sunday, March 1, 2015

Mute Individual Chrome Tabs

Chrome has the ability to be customized to almost any extent you can imagine. One feature that I have always wanted was the ability to mute individual tabs. Well it seems like this is something that you can finally do (even if it's just in beta mode).

Let's set the scene:
You have students doing some free writing with a great classical piano playlist from Pandora on in the background , but you need to load a Youtube video to show after the free write.

As you load the Youtube video, you begin to do your free write with the students, but it will automatically start playing once the page is loaded. Now you may have an issue: if you forgot about the tab, the video and sound (or even worse, advertisements) start playing over that beautiful Chopin Sonata.

Enter Chrome Experiments

Go To:

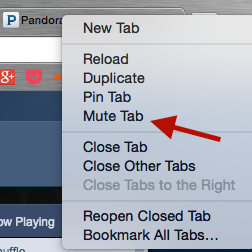
After you have enabled "Tab Audio Muting", you can now right click on any tab and mute it. 


Also, if you have a tab that is playing sound (distinguishable from the speaker icon on the tab), you can just click the speaker icon to mute the tab. 

You can preemptively mute a tab and it will remain muted until you need it to be un-muted.