On the frontlines – teaching students; teaching teachers. A source for EdTech tips, tricks, and solutions.
Showing posts with label shortcuts. Show all posts

Friday, August 7, 2015

Google Classroom Home Screen Organization

If you are like me and have several classes set up in Google Classroom, it's really convenient to have your Home/Dashboard set up in a way that makes sense to you. For me, I like to have my class cards go in chronological order of my school day (Periods 1-7).

The problem with this is that once you have classes created, you can't reorder the cards in your home screen of Google Classroom.

Solution #1 - Create classes in a specific order:

As you create your classes, think about how want your Home/Dashboard arranged.  If you want your class cards to show up in a certain order, create your classes so that the class you want to appear last is created first. 
In the picture above, you'll notice that I ordered my classes by their section, not by the class name. In this arrangement, I created my period 7 class first so that it would end up at the end of my cards. 

What if I have shared classes?

If you are sharing your classes with another teacher (or yourself in a whitelisted approved domain), you will need to add the co-teacher as you create each class in order to keep the arrangement that you desire. If you have created all of your classes and go to add a co-teacher, the cards will not be organized on the other teacher's end. 

The bottom line: think about how you want things to appear before you begin creating classes. 

Solution #2 - Using Bookmarks:

If you have already set up your classes in Classroom, there isn't much that you can do to organize your cards. However, there is a workaround. Before I realized how to create classes in the order I wanted, I used bookmarks to keep my Google Classroom workflow easy. 

If you click on a card and open one of your classes, it has a unique URL that you can bookmark. When you bookmark this class, you can edit the name that shows up on your bookmark. Make it as specific or as short as you want. See image below:


If you want, you can put all of your bookmarks in a folder to free up space on your bookmarks bar. 


Sunday, March 1, 2015

Mute Individual Chrome Tabs

Chrome has the ability to be customized to almost any extent you can imagine. One feature that I have always wanted was the ability to mute individual tabs. Well it seems like this is something that you can finally do (even if it's just in beta mode).

Let's set the scene:
You have students doing some free writing with a great classical piano playlist from Pandora on in the background , but you need to load a Youtube video to show after the free write.

As you load the Youtube video, you begin to do your free write with the students, but it will automatically start playing once the page is loaded. Now you may have an issue: if you forgot about the tab, the video and sound (or even worse, advertisements) start playing over that beautiful Chopin Sonata.

Enter Chrome Experiments

Go To:

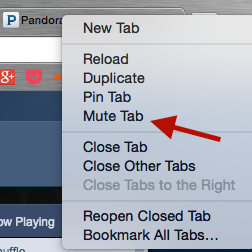
After you have enabled "Tab Audio Muting", you can now right click on any tab and mute it. 


Also, if you have a tab that is playing sound (distinguishable from the speaker icon on the tab), you can just click the speaker icon to mute the tab. 

You can preemptively mute a tab and it will remain muted until you need it to be un-muted. 

Thursday, September 11, 2014

Keyboard Shortcuts in iOS


Typing things out on a full size QWERTY keyboard is so much easier than on a smaller touch screen. You can set up easy keyboard shortcuts to type the more difficult things like email addresses which require different punctuation.


If you are frequently putting your email address into forms, emails, or log in screens, this tip can save you a lot of time.


Keyboard shortcuts are the new shorthand!


Shortcut your email address

  • Go to your settings app
  • Select General
  • Scroll down to Keyboard
  • Scroll down to Add New Shortcut...
  • Enter the phrase you want to shortcut
    •  I demo my email address
  • Enter the shortcut you want to use (I like using @@ for my primary email; @@@ for my secondary email)
  • Click save in the upper right corner

You're all good to go - keep your thumbs happy by not having to type so much! 

Tuesday, September 9, 2014

Make Goobric Count for You

I have been using Doctopus and Goobric (click link to see the walkthrough) extensively this semester already. One of the things that I was struggling with was that Goobric doesn't automatically add up the scores from a rubric so that I can easily enter the grade into a gradebook.

I was trying forever to figure this out, but then I realized how silly I was being. You can simply set up a SUM formula for the columns of the rubric so that it will automatically add up all of the elements of the graded rubric.

Create the formula:


  • Go to the column that says grade (create when you run Doctopus)
  • Goobric adds columns based on the categories of a rubric you assign to the document
  • In the grade column, enter the formula (or change based on the needs of your rubric):     
    •  =SUM (l2:r2) - I typed in each cell, just so you can see the range that this formula will do
  • Since my rubric is scored on columns l, m, n, o, p, q, r, I need to add those columns together **or however many columns you have for your rubric**
    • My rubric has 6 categories, so there are 6 cells that I am adding together
    • If your Goobric has 4 categories, your formula will look like: =SUM (l2:o2)


Even more magic:

Now, instead of entering this formula for every row (changing l2 to l3 etc.), there is a great trick to replicate that formula for every row. 

In the lower right hand corner of the cell with the grade, you have a blue box. Click the blue box and drag it down the column till the last student on your roster, and it will replicate that formula for every row. You'll see in the illustration that each row that has grades from the rubric will be added up in the grade column (J).  


This will save you time trying to add up each element of the rubric. And if you set up the formula before you grade it, your grade (sum) will show up even if you aren't in the spreadsheet. 


Wednesday, July 30, 2014

Productivity with Keyboard Shortcuts (Mac OSX)

A couple months ago, I was at a conference where I was presenting with a bunch of friends. One night as we were putting some final touches on one of our sessions, my friend Chris, was basically in awe at how I was working on my Macbook.  To paraphrase his awe: "I sold Apple computers at the Apple store and I didn't even know you could do that."

Since that night, if the question comes up about a keyboard shortcut for something, I'm their go to person.

Here are some of the keyboard shortcuts that I use on a regular basis to keep the work flow smooth. Many of these will transfer over to Windows or Chromebooks by using the Control button instead of Command (⌘).

Google Chrome:

Command(⌘)-L - Take control and highlight all text in the Omnibox (address bar)
  • Great for quickly going to new addresses or starting new searches without clicking on the mouse
Command(⌘)-T - Open a new tab in Chrome
  • Extension of this, hold command as you click a link to open the link in a new tab
⌘-Shift-T - Open the previously closed tab
  • This also will continue working for a while as it will keep opening previously closed tabs
⌘-`(~) - Switch between open windows of a program
  • This is great for running multiple user accounts in Chrome and quickly switching between the user windows
⌘-D - Bookmark the address that you are currently viewing

⌘-Number Keys - Go to that number tab open in the window (1-9)

⌘-opt-shift-v - Paste and match destination formatting
  • Great for pasting into Google Docs from another site where the font is different

Bonus Google Chrome:

Some individual Chrome extensions allow the ability to assign keyboard shortcuts to launch an extension or perform a function.  Example: with Evernote WebClipper, pressing `(~) will launch the web clipper extension.

Mac OSx

⌘-Spacebar - Go to Spotlight Search bar 
  • Once again, launch an application by doing the shortcut and starting to type the application name and press enter...no cursor or mouse clicking.
⌘-shift-3 - Take a screenshot of the whole screen

⌘-shift-4 - Take a screenshot after cropping/capturing a certain area

⌘-shift-4 then Spacebar - Take a screenshot of a certain window (the cursor turns into a camera)
  • Even more options for this as well: Click on a menu option in the window, do the shortcut, and take a picture of just the drop down menu
⌘-Tab - Switch between open application on your computer - continuously press the tab button while holding down the ⌘ button and you can keep moving through your applications

⌘-option-Esc - Force Quit - if an application has stopped responding, hit the shortcut and select the app to close


This is the bulk of them for now, but I have some good shortcuts for using the trackpad on a MacBook Pro or Magic Trackpad and some reminders of the shortcuts in Google Apps.