On the frontlines – teaching students; teaching teachers. A source for EdTech tips, tricks, and solutions.

Monday, August 11, 2014

Custom Page Settings in Google Apps

One thing that is often overlooked in the Google Apps suite is the option available to you in the page settings menu option. This is a rundown of your options

In Google Docs:

Click File>Page settings:
  • Change the orientation of the document (Portrait or Landscape)
  • Change the page size to a preset size for different purposes (tabloid, legal, etc.)
  • Change the margins of the document
    • This one is really important to me because I prefer narrow margins on all of my docs
  • Pro-Tip - Set the page settings that you like as the default and each new doc that opens will follow that default setting!

In Google Drawings:

Click File>Page setup
  • Change the size of your canvas to preset sizes
  • Customize the size of your canvas using a custom setting:
    • This is great for creating headers, website icons, buttons, etc. 
    • You can pick whatever size you need for your project

In Google Slides:

Click File>Page Setup
  • Change the format of your screens for different projectors (4:3, 16:9, 16:10)
  • Customize the size of your slides in custom settings using Inches, centimeters, points, or pixels


Thursday, August 7, 2014

Table of Contents Add-on

For my students, I have a reading guide that is through Google Docs. As they are doing each reading assignment, they are going through the document and answering questions & learning vocabulary. When the document gets to be rather large, it takes awhile to scroll to the bottom pages just to get to the assignment.

What you could do is insert a table of contents on the top page and it will populate your headings and subheadings so that you can see it. But what happens when you are on page 20 and want to get back to the top?  The Blendastic-Bombastic Personalized PD team puts links to the table of contents in the footer so that you can easily click back to the table of contents. Brilliant idea if you ask me.

If you don't want to go through the process of navigating the links, the Table of Contents add on allows you to see the table of contents to the right of your document - at all times. It also gives the option to have the Table of Contents sidebar for anyone viewing the document.

In order for this to work, you need to make sure that you have used the heading styles as you would want them to appear on your doc.

Example:

Heading

Subheading

Minor Heading

Google docs will automatically order the table of contents assuming you have used the styles for your headings and subheadings.

When the add on window shows up, if you click on "always open for this document", the table of contents on the side will always show up for anyone viewing the document.

An example of the TOC always showing up is my Doctopus Walkthrough doc: bit.ly/doctopusaddon

Here's how it looks in a pretty little .gif:


Wednesday, August 6, 2014

Doctopus Walkthrough with GClass Folders & Goobric


Getting ready to start the year and want to play around with some add ons? Doctopus gives you some functionality that Google Classroom hasn't provided yet. This means it can be a great substitute or an extension of using Classroom. 

Feel free to make a copy of the following Google Doc to share with your colleagues & friends:

Getting Started:

What is an add-on?

  • An add-on is an app or extension to your Google Docs or Spreadsheets. They give you the ability to do something beyond what Google allows.
  • In the past, there was the option to use scripts, this has taken its place for most functions.

What this guide will help you with:

  • Doctopus - a digital photo-copier for your students
  • gClass Folders - an extension of Doctopus that creates folders for your classes from a spreadsheet
  • Goobric - A chrome/Doctopus extension that allows you to attach a rubric to any Google doc shared with Doctopus.

How to get Add-ons:

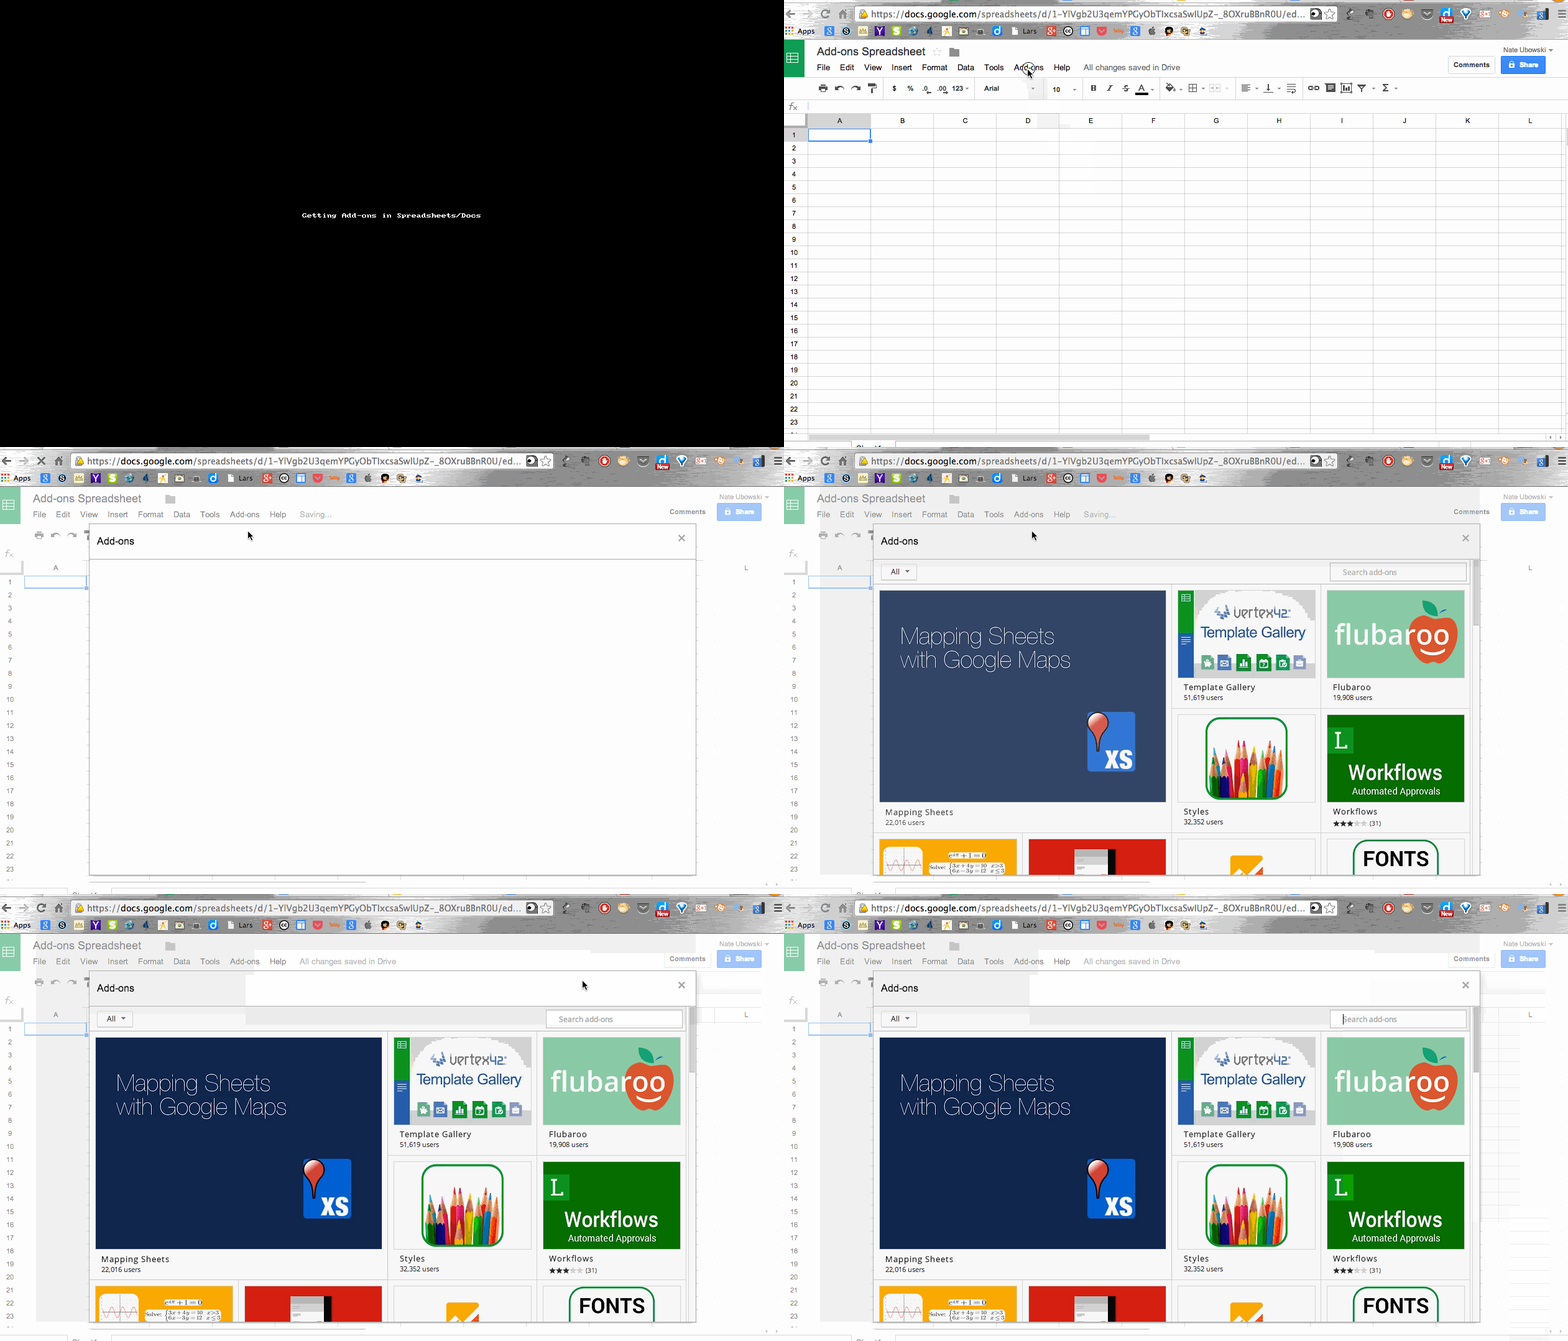
Open up an old/new spreadsheet or doc, select Add-ons from the file menu, then select get add-ons.


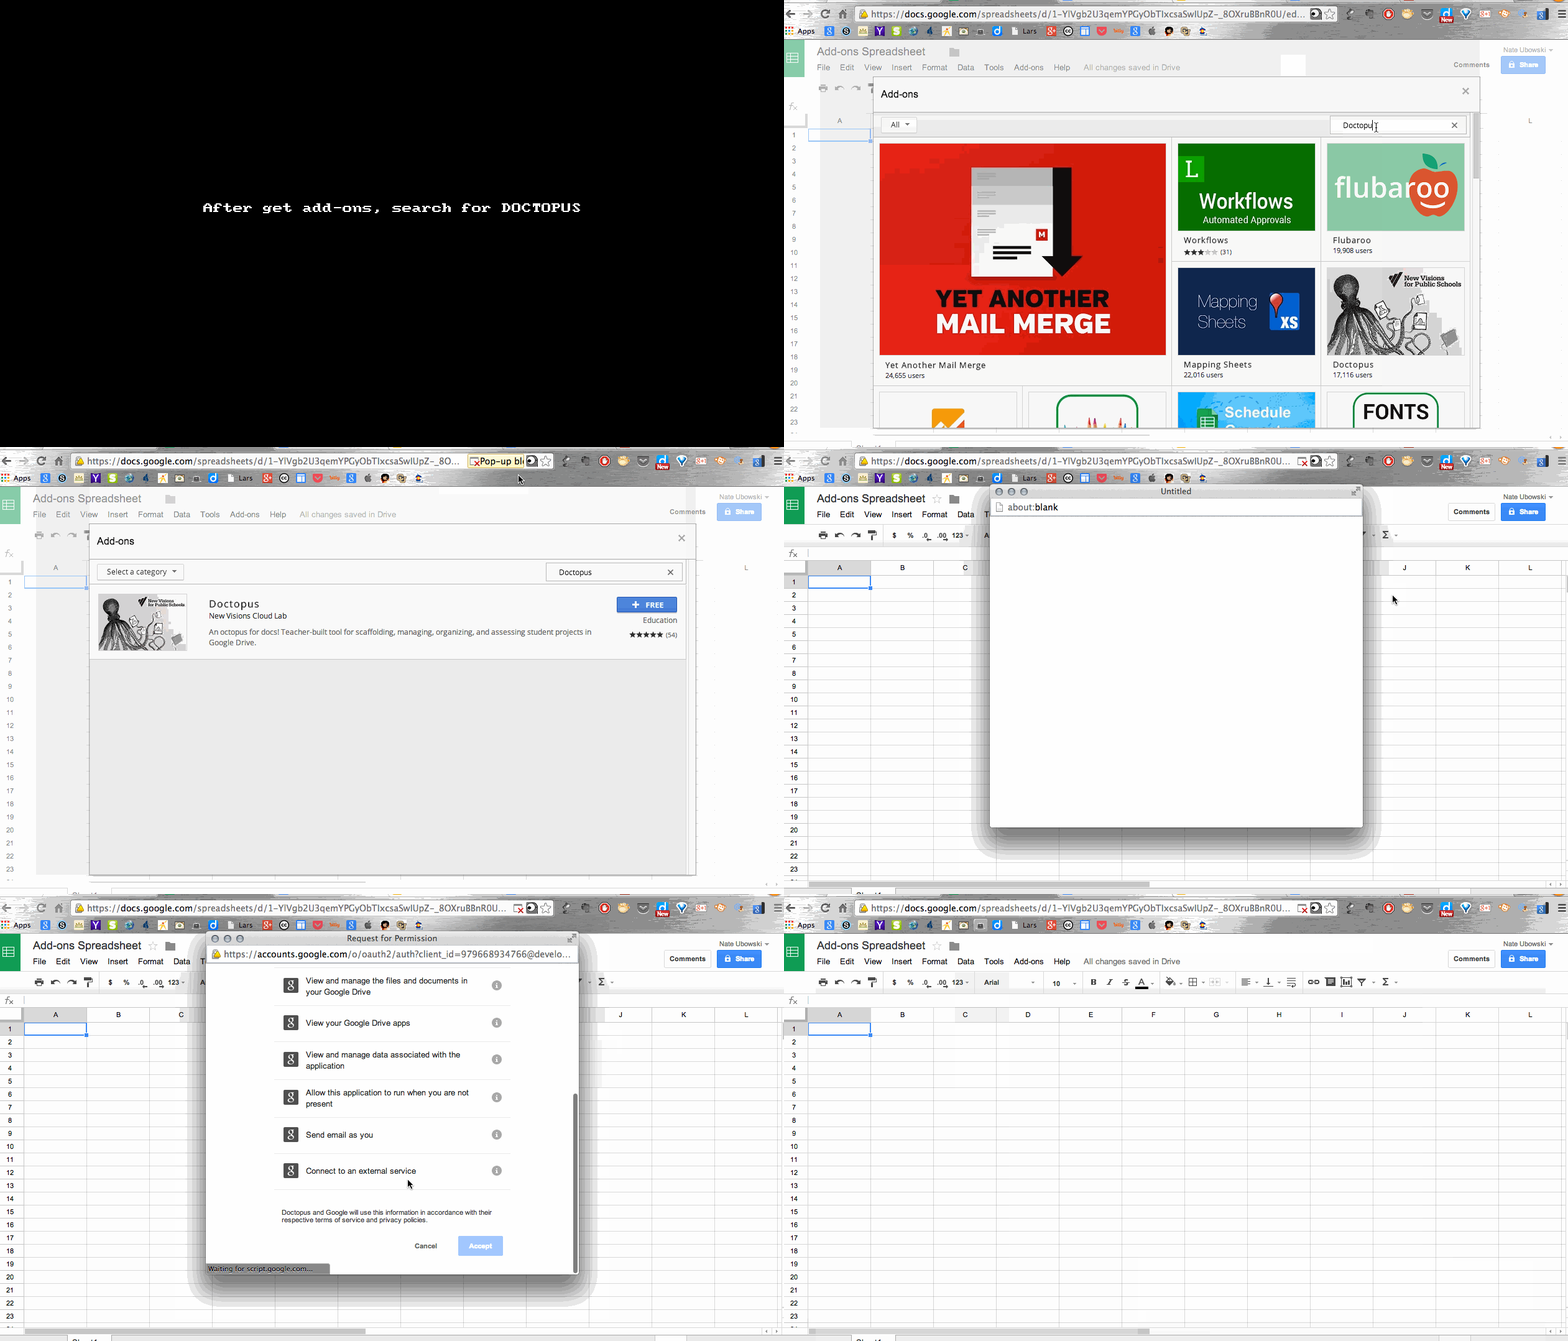
When the add-on store comes up, search for any add-on that you would like to use. For us, we will be searching for Doctopus.

You may have to deal with the pop-up blocker - if so, just override the error so that you can give Doctopus the rights it needs to run.


Any time that you “get” an add-on, you will have to give the add-on permissions for it to work its magic.

Creating a Roster:


In order for you to use Doctopus with your class, you need to have a roster with first names, last names, and gmail accounts.  *it is important to have the last name especially if you have students with the same name.

There are ways to export this information from most gradebook programs (ask your technology coach for help). If you are pressed for time, you can always create a Google Form to have students fill in their information. Either way will give you a class roster that you can use to build your roster.

Once you have your roster information, you can launch Doctopus.

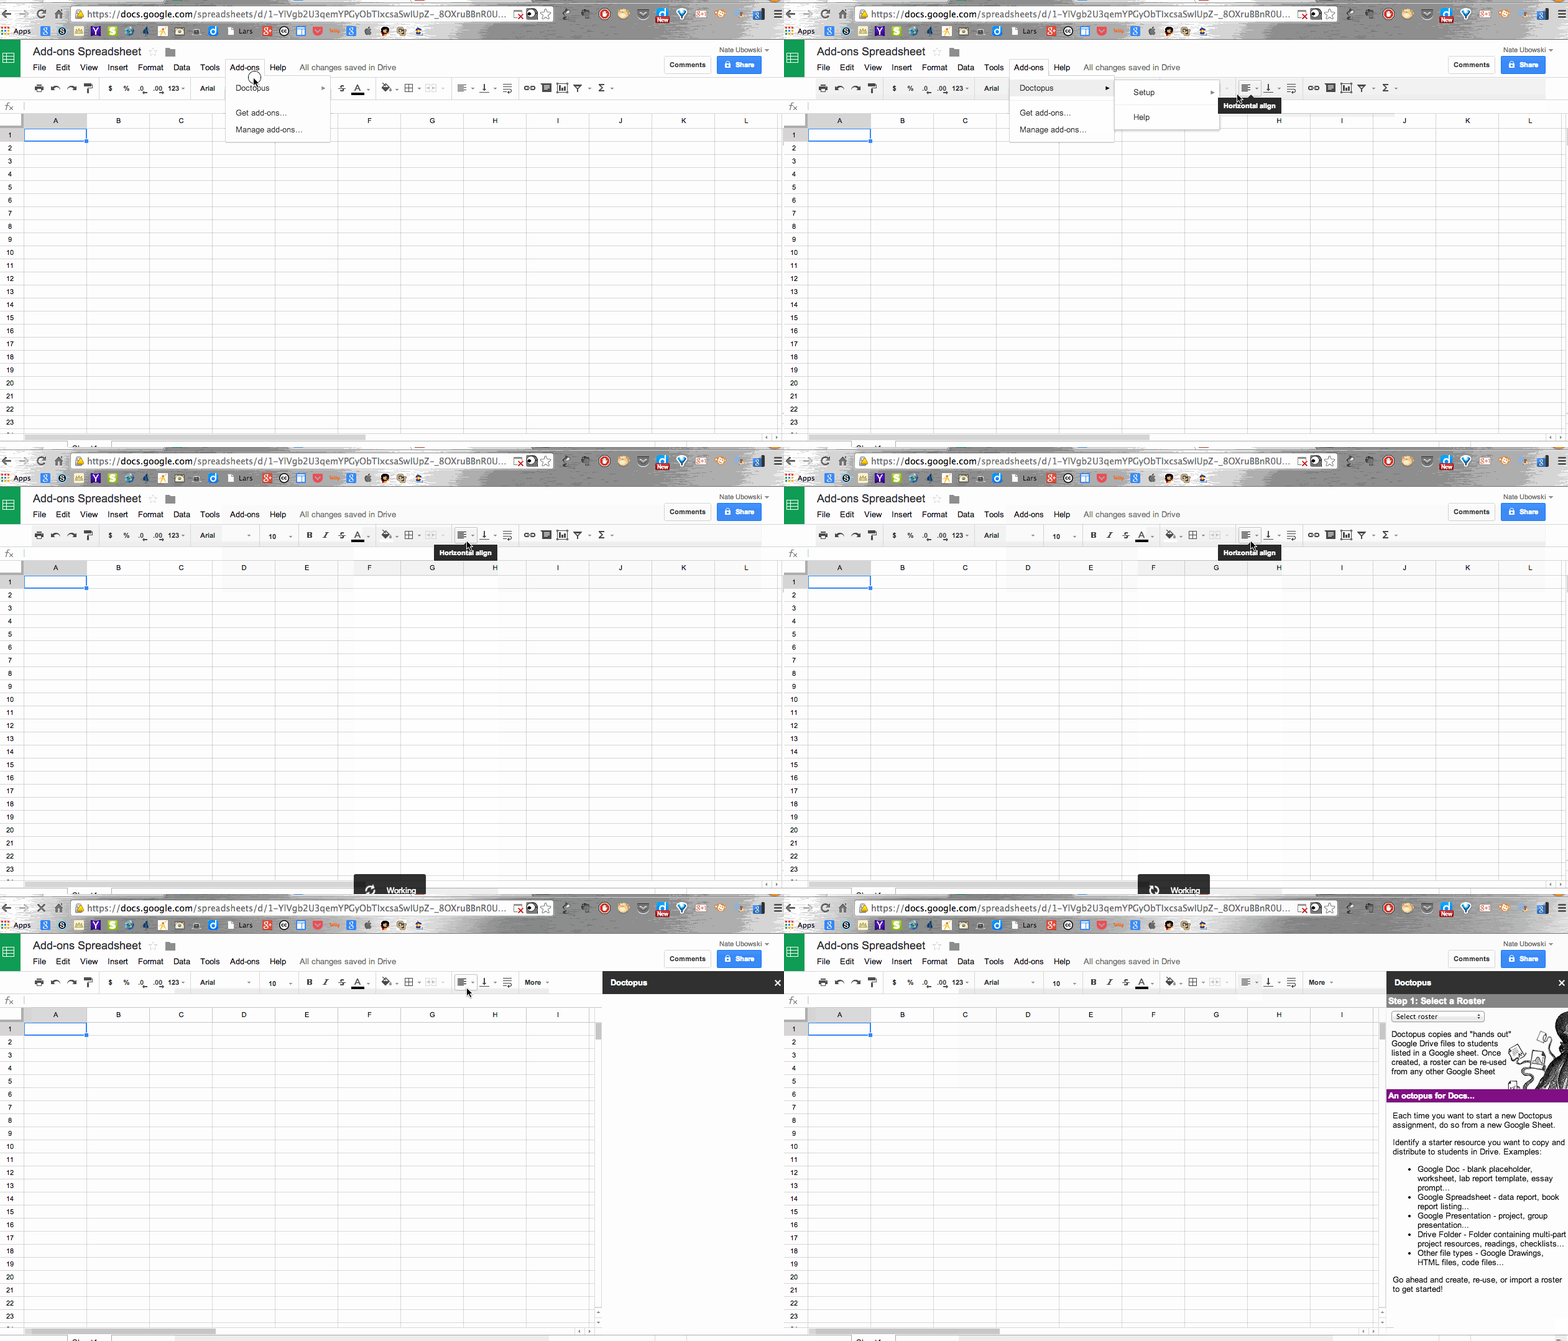
Go to your Add-ons menu option again, and select Doctopus, then select set-up (This menu option will change depending on how much you have used Doctopus before)

From here, you will be working in the right hand sidebar for a few steps,

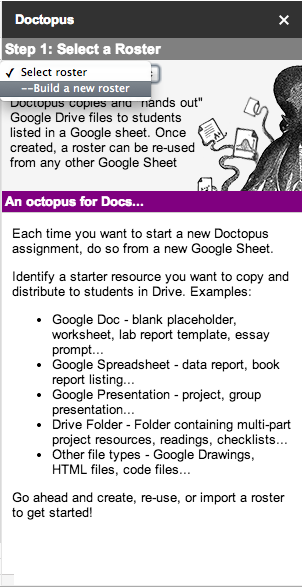
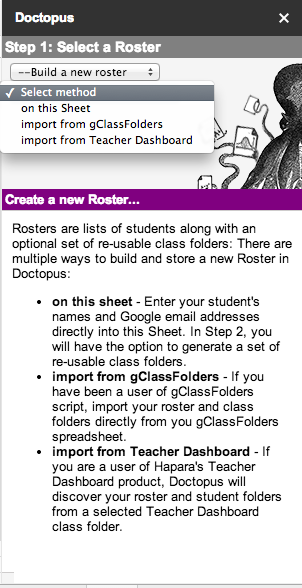
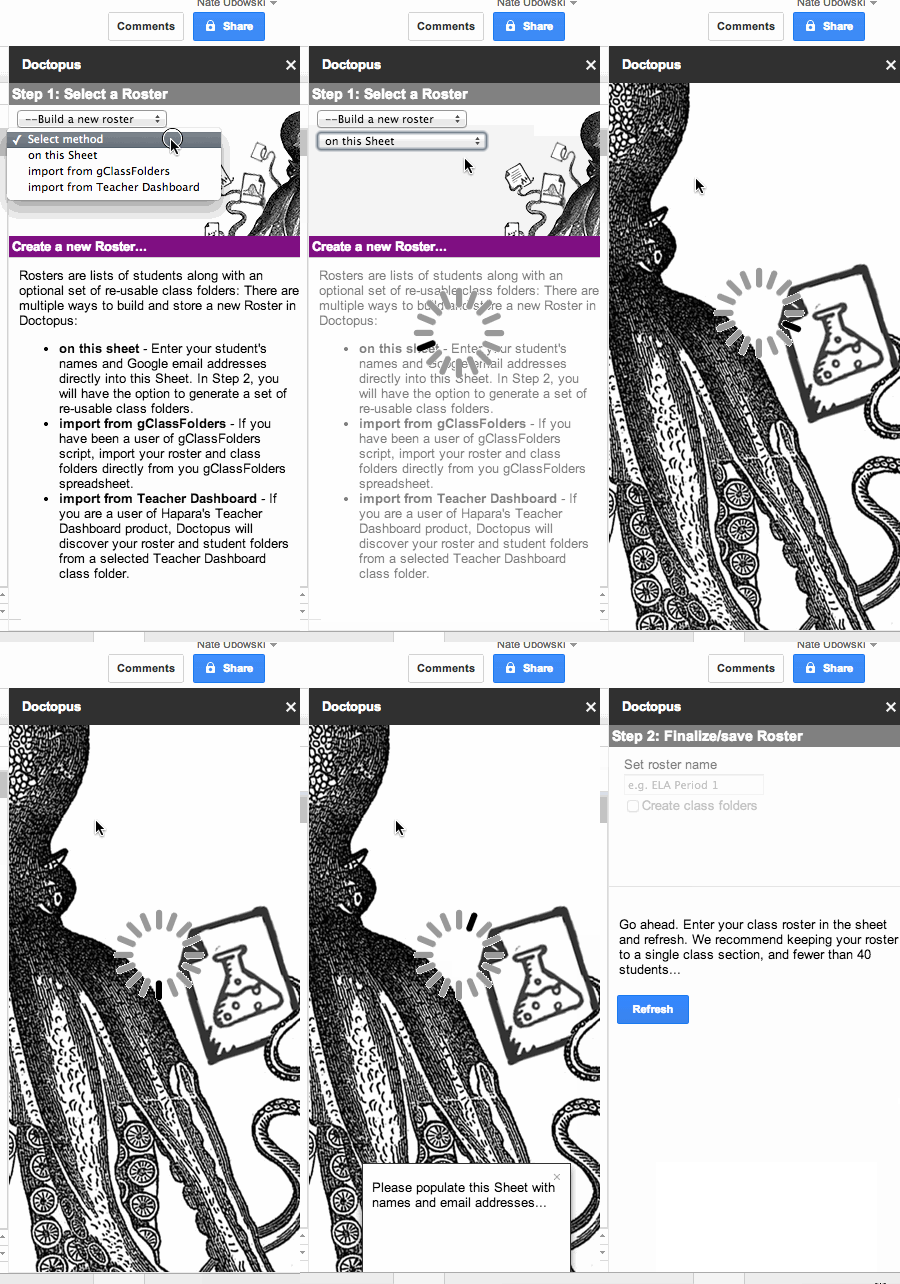
Step 1: Select/Build a roster


You will be given an option on the method to build your roster:
If you are starting everything from scratch, select “on this sheet”.  Then hit Create Roster

Step 2: Finalize/Save Roster

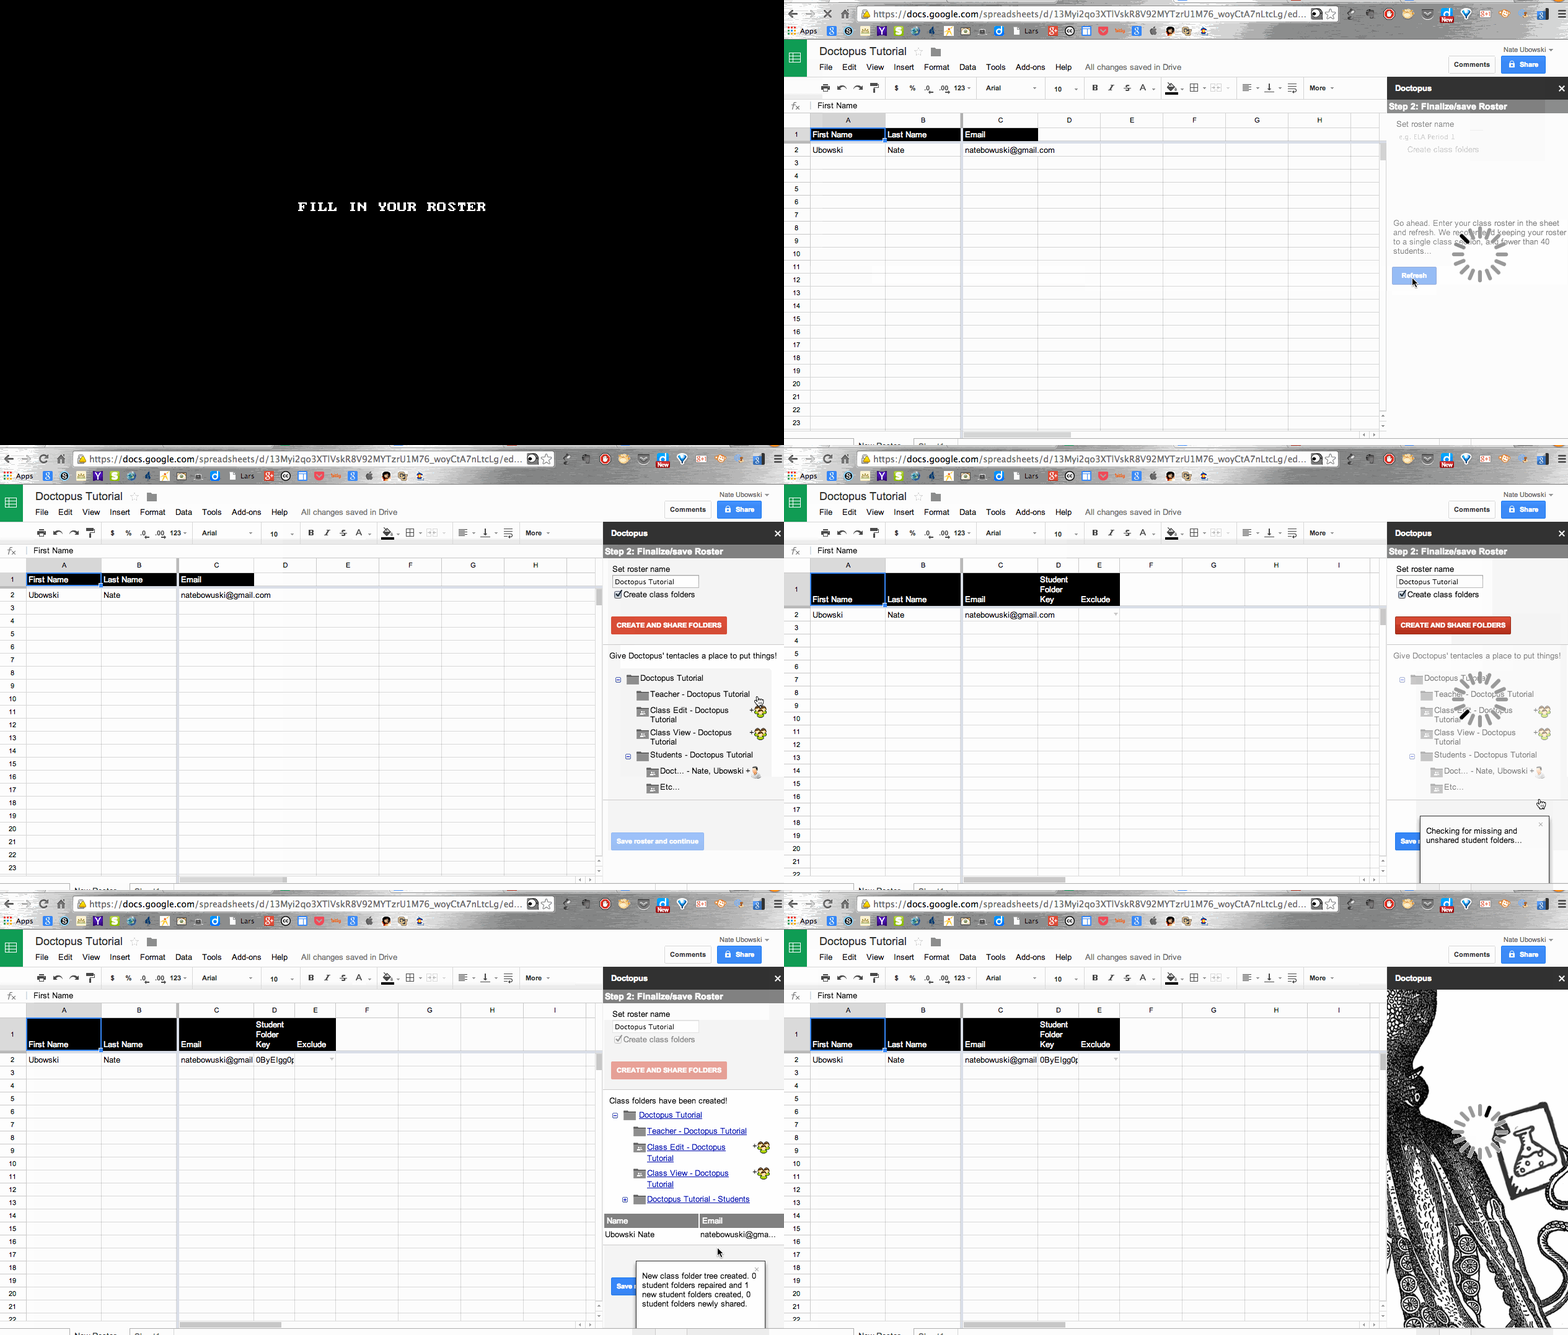
Now is where you get to put in all of the student’s information (names & emails).  Copy and pasting definitely works.  My example is just with my email since I don’t want to violate FERPA with any of my real students’ names.


  1. Fill in names and emails
  2. Give the roster a name (I use a different roster for each period/section of a class I teach)
  3. Click Create and Share folders (If you don’t want to create folders with your students, leave this box unchecked).  ***Keep in mind, you can always delete folders; you can delete later if you want.
    1. This is gClass Folders working with Doctopus. It populates the folders and sharing properties automatically. The folders created are:
      1. Student dropbox (A folder between just you and each individual student)
      2. Class Edit folder (Anything in this folder, the class can edit - great for collaborative notes)
      3. Class View Folder (Anything in this folder, the class can only view)

Doctopus will save all of your rosters, you just have to add each roster individually and save them in step 2 of Doctopus. You can also delete any roster from this same menu after it has been created.

Sharing with Doctopus:


Now that we have created a roster and set up folders, we can now operate in a paperless classroom using Google Docs & Doctopus.

One of the great things about Doctopus is that it saves time by not having to have students make a copy of every document that they need to work with.
KEEP IN MIND: every document that you want to share with your students has to be in a folder; it cannot be housed in “My Drive”.  

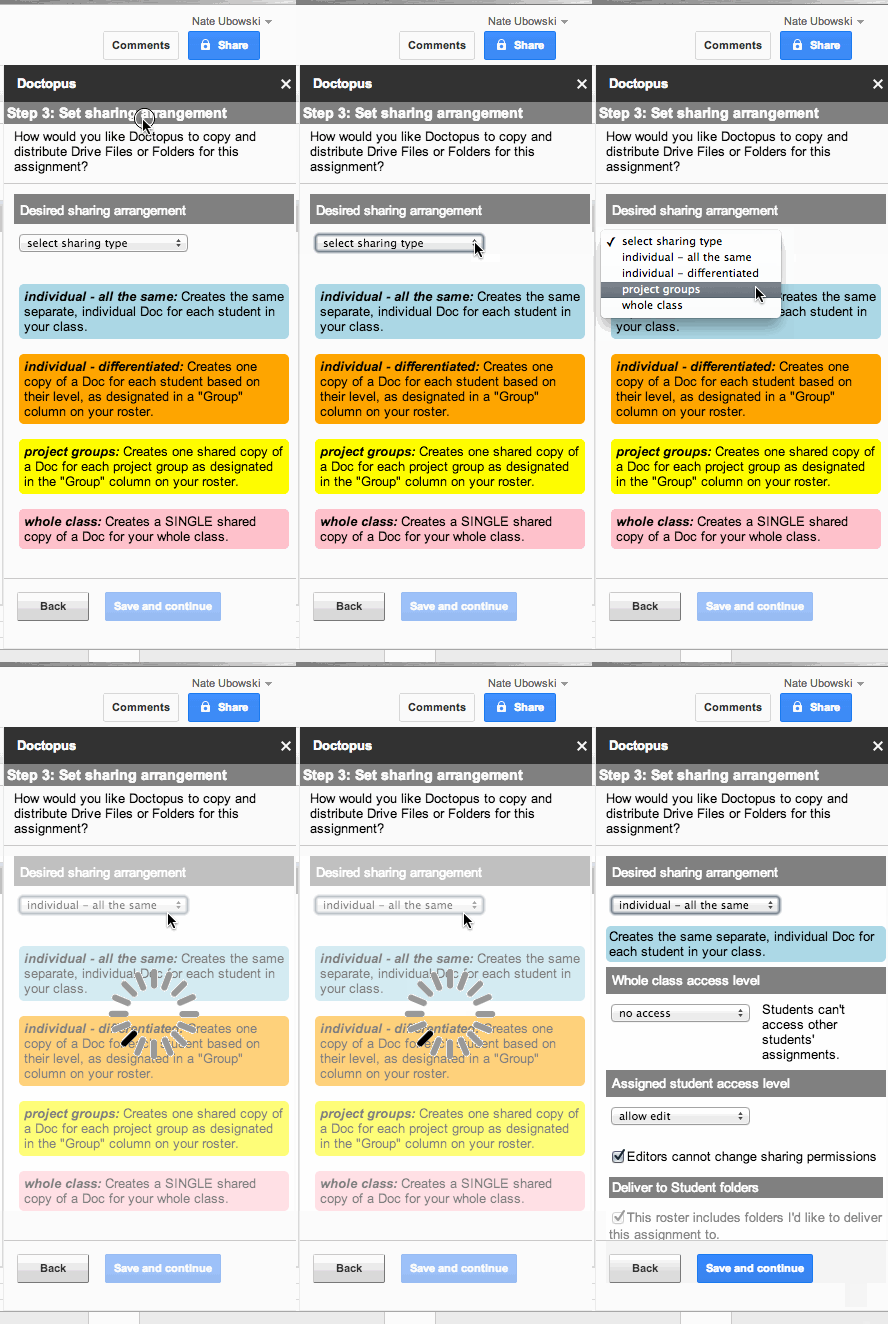
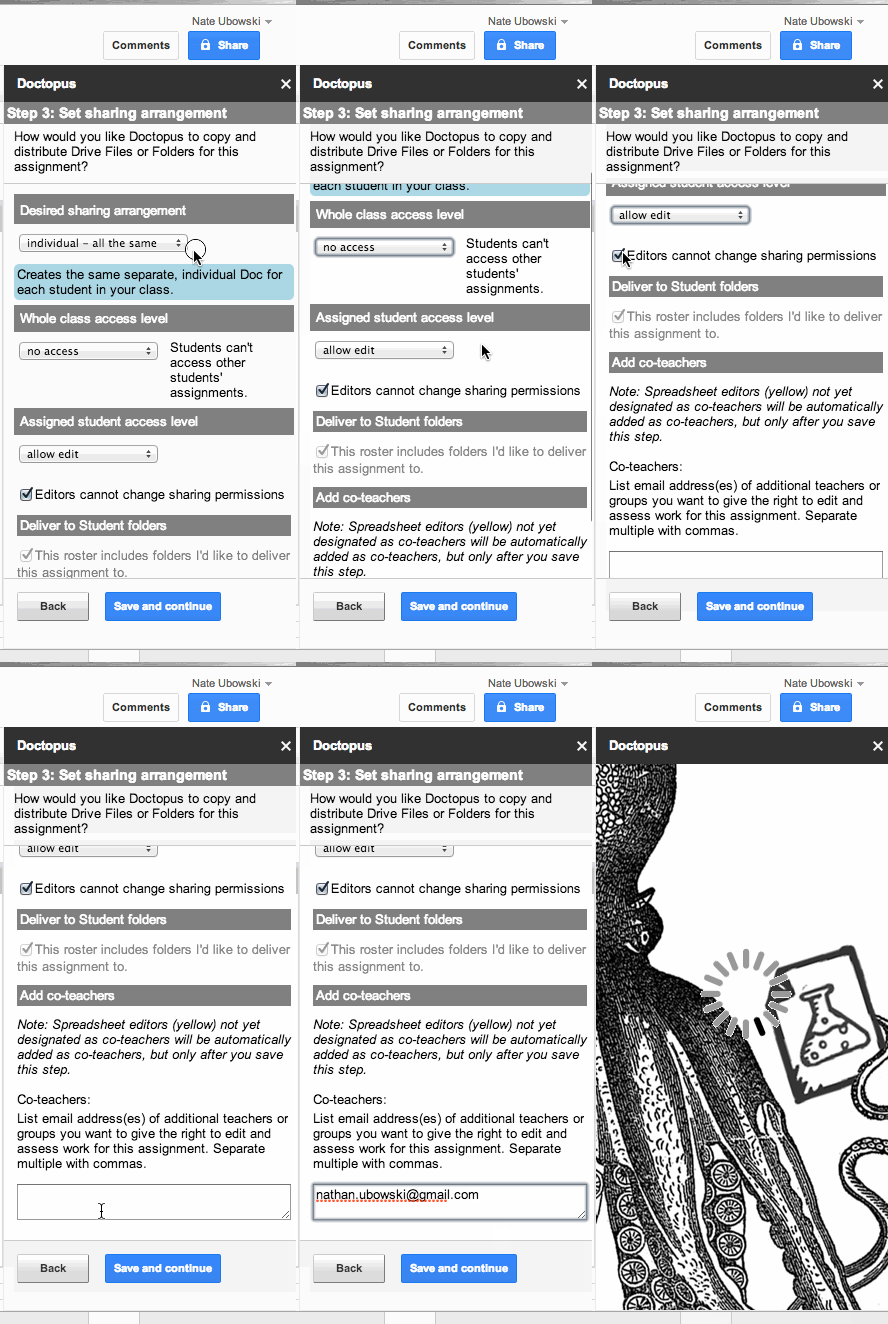
Step 3: How do you want to share your document?

Step 3 (Cont) Sharing properties:


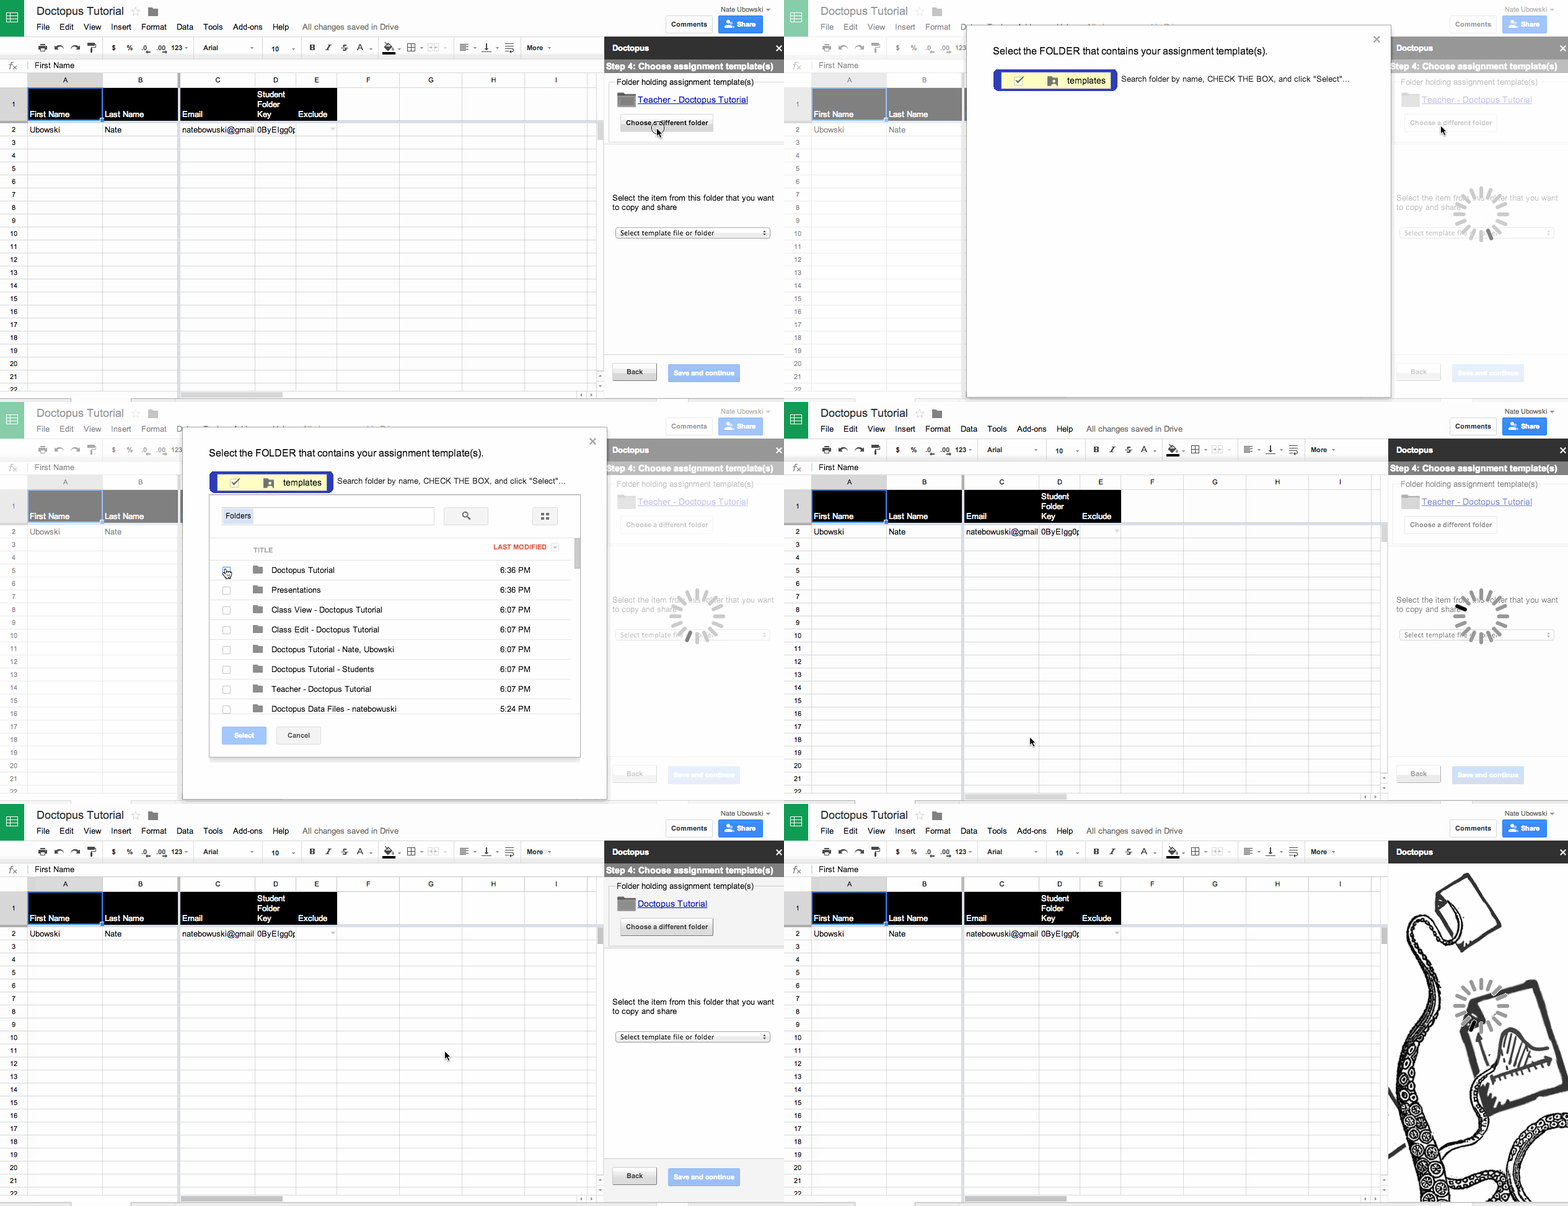
Step 4: Choose Assignment/Template


First thing about choosing the assignment is that you have to choose the folder the document/spreadsheet/presentation is in first.

After you choose the folder, then choose the document you want to share out in the dropdown menu


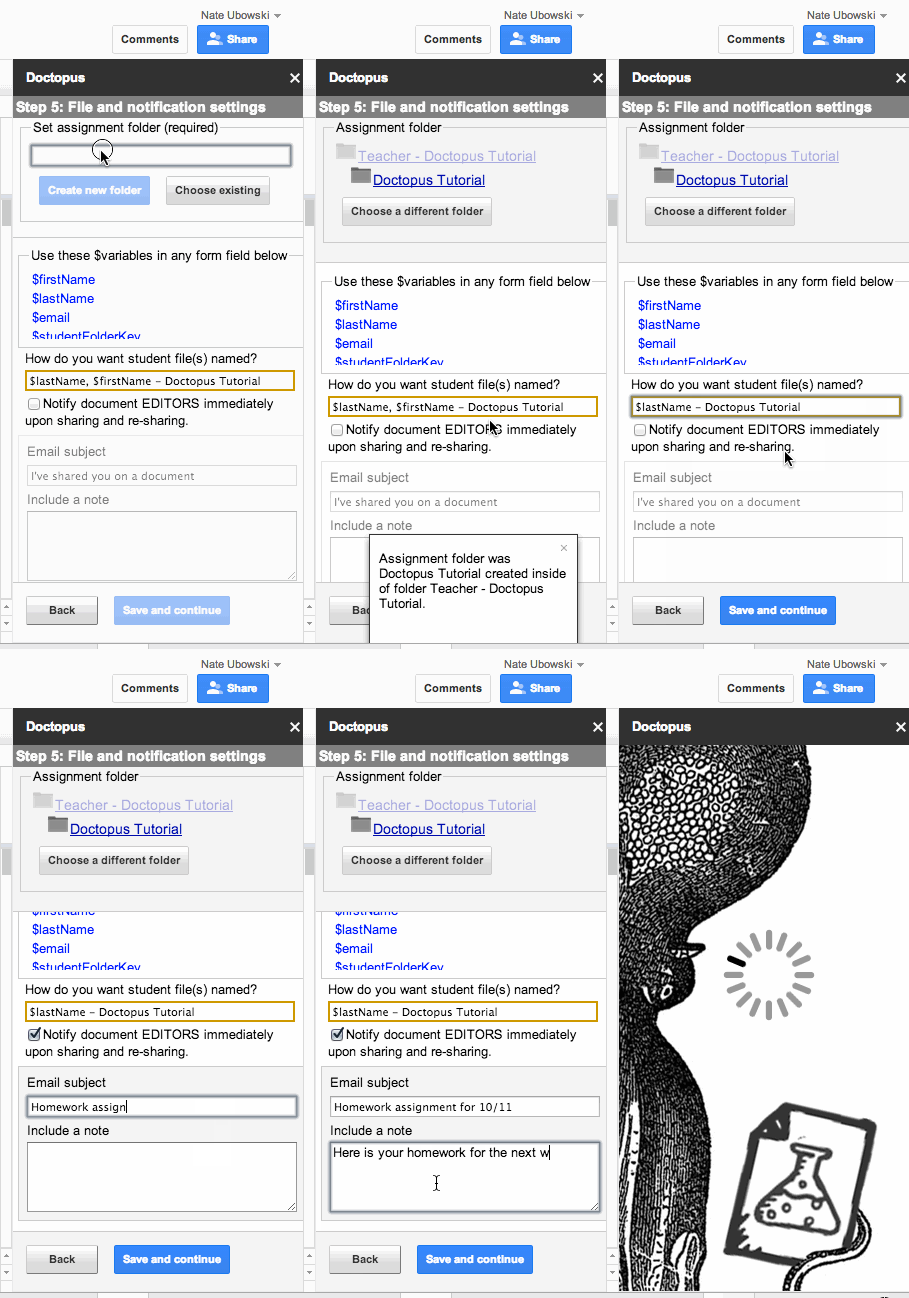
Step 5: File and Notification settings:


Choose the destination folder for the students’ copy of the document
  • Choose existing (Window pops up that you can choose a destination folder)
  • Create a folder named whatever you want
    • You must hit the create folder before proceeding to the next step

You can also send an email to students when you share this assignment (I don’t usually do this so I don’t flood their email boxes).


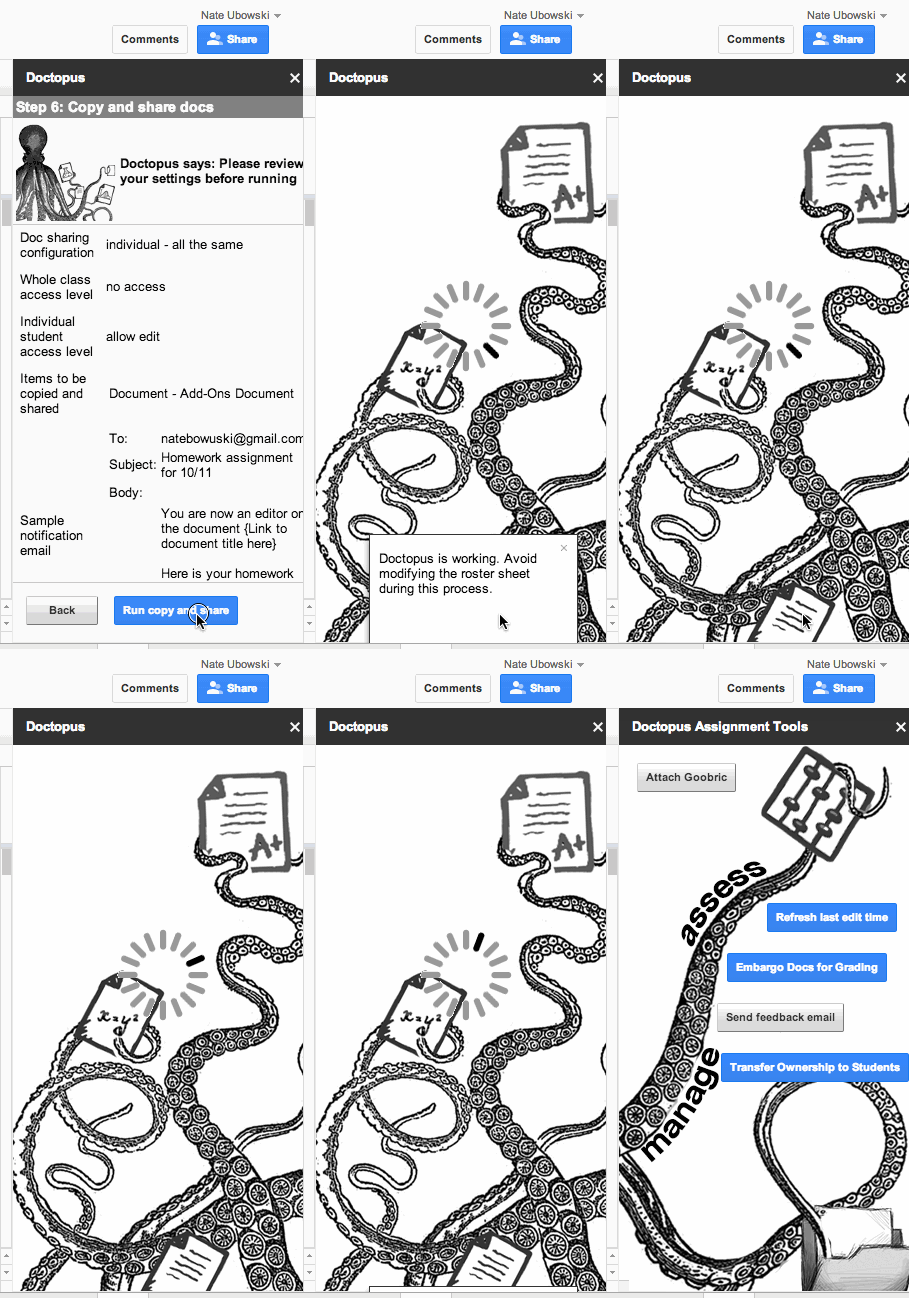
Step 6: Run, Copy, & Share:


Depending on the size of your class, this could take several minutes.

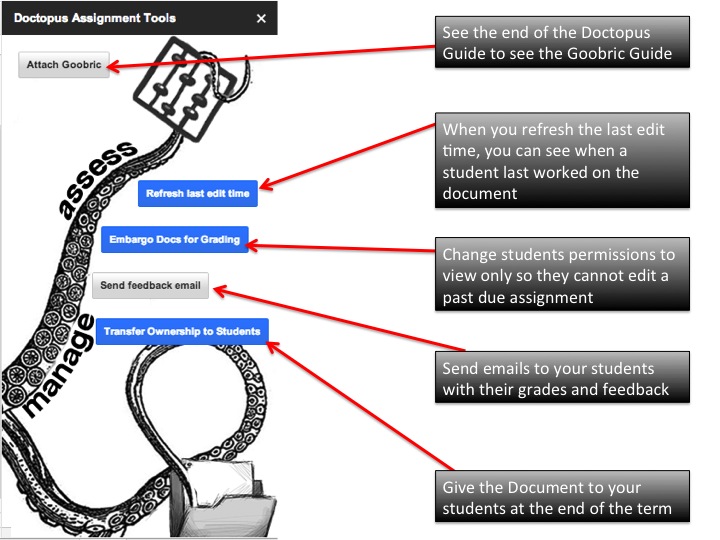
Your Doctopus Options after Sharing


Embargo Document for Grading:


If you want to grade something and not let students edit the document, you can turn the students’ rights to view only through the “Embargo Docs” for grading option.


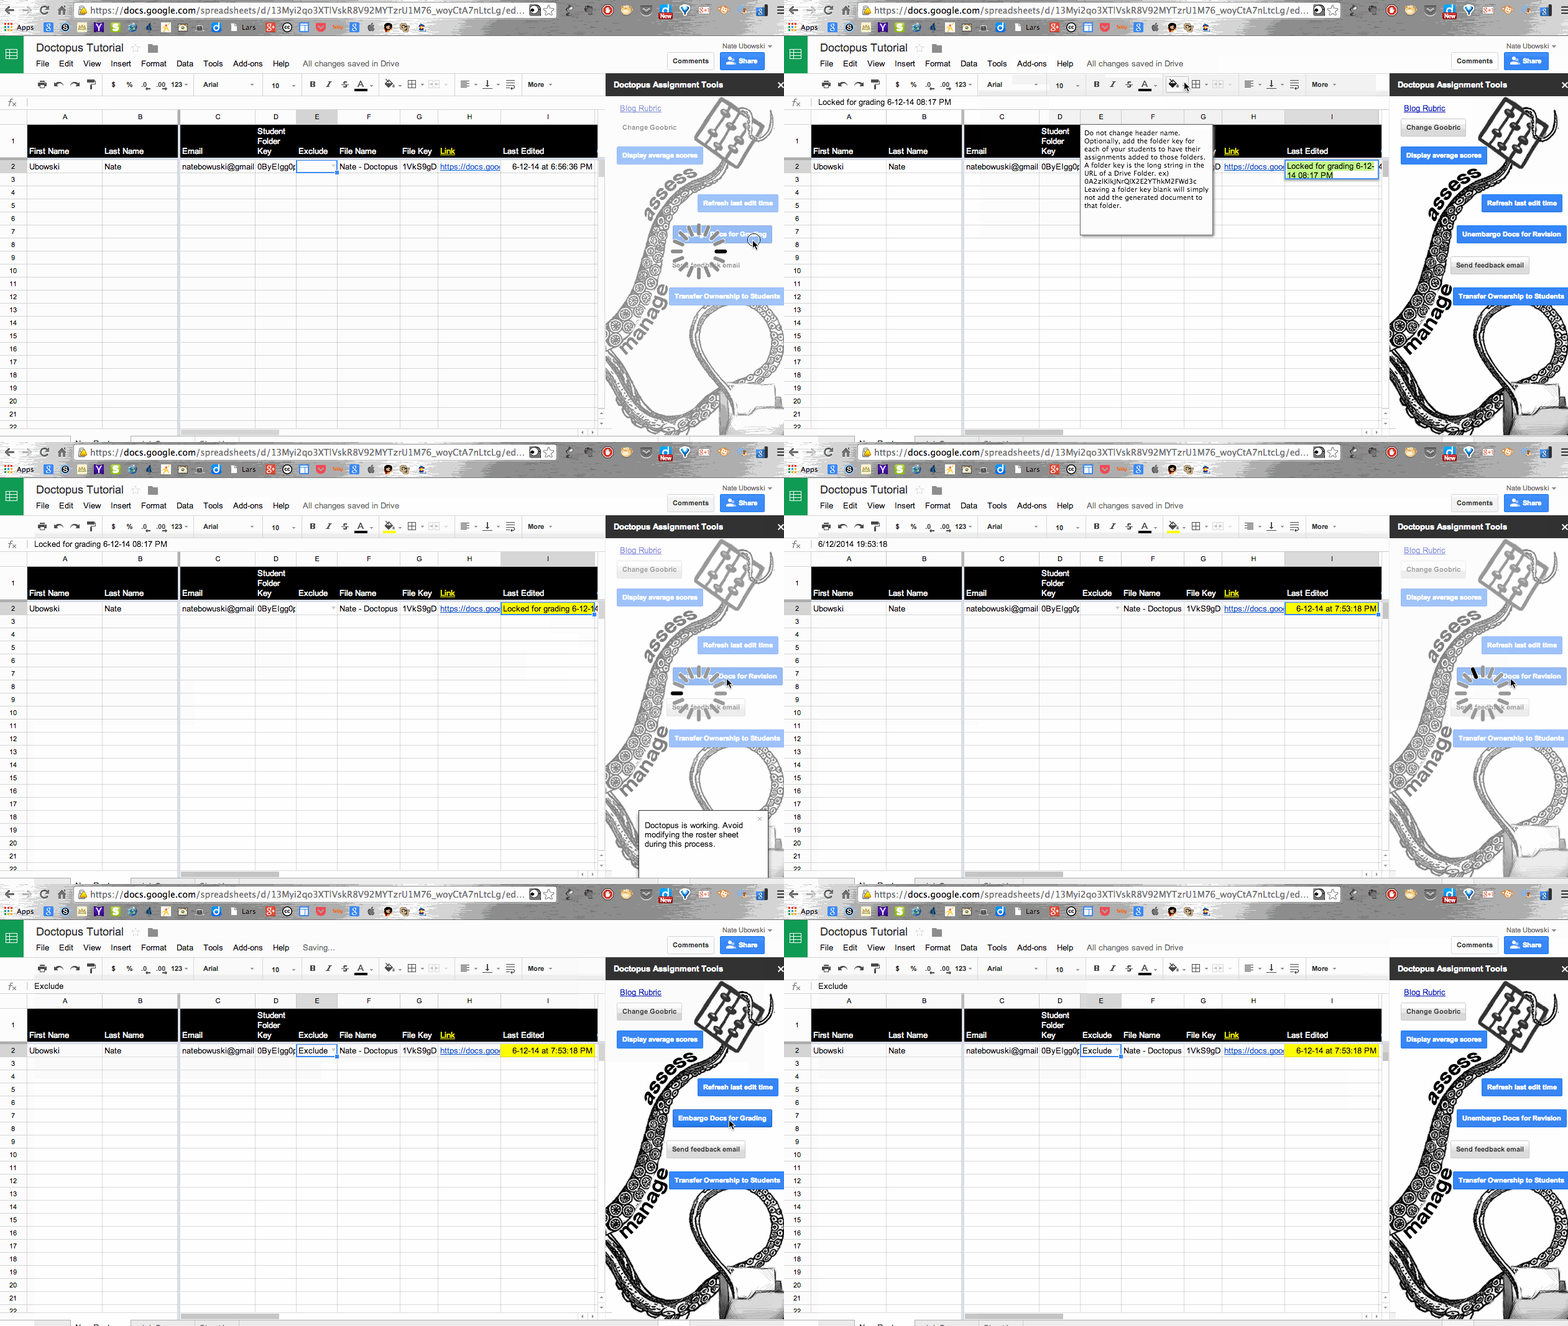
Exclude Student

There is an exclude option which allows the Doctopus embargo to skip that document.  This is perfect for a student who needs extra time on assignments or if a student was absent from class the day the document was being used.

When you check exclude, you can run the embargo and it will skip that student.  

If you need to restore it, you can Unembargo the document again.

If you need to delete an exclusion, just highlight the cell for that student and delete the exclude.  

Doctopus Notes

Anytime you want to access these options on a spreadsheet where Doctopus was ran, just go to your Add-ons on the menu and launch Doctopus again.  

Everytime that you want to assign something using Google Docs, you just need to create a new spreadsheet and launch the Doctopus Add-on and walk through the steps again, without having to create new rosters.

Many wonder what Doctopus will look like after Google Classroom is introduced in the fall.  The creator of Doctopus, Andrew Stillman,  shares his thought on Google +.

Good Luck and email me if you have any questions about how this works: natebowuski@gmail.com


Continue reading for the Goobric Walkthrough
⇓

Goobric Tutorial

**Only available using Chrome as your web browser

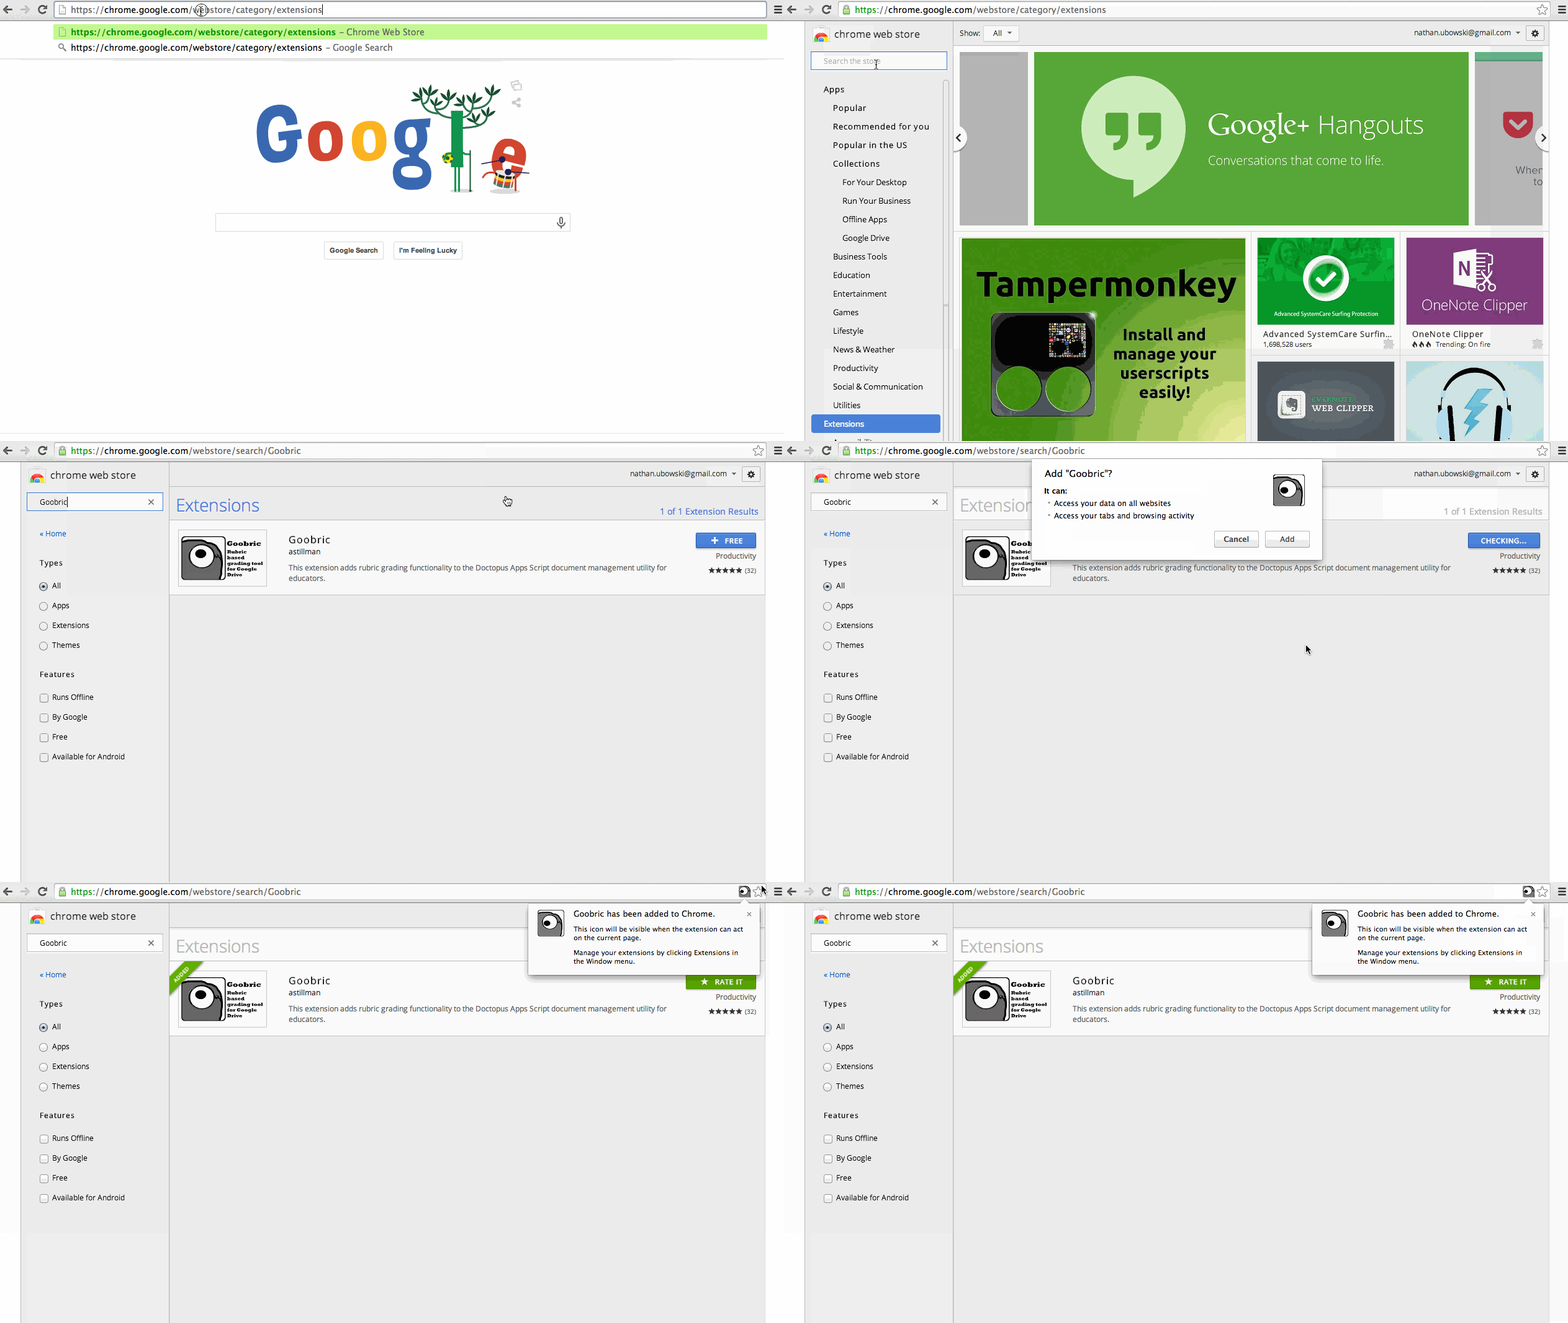
Install Goobric Extension

Go to Chrome Extensions and search for Goobric

  • Add the extension by hitting +Free
  • Click add “Goobric” when the popup shows up
  • You will see a little logo show up on your address bar on any page that will allow a Goobric to be used (Google Docs)

Create a Rubric

You need to create a rubric on a Google Spreadsheet in order to use it for Doctopus

Here’s a sample of my Blog Rubric.

  • The categories need to be on the Y-Axis
  • The proficiency levels need to be on the X-Axis


Launching Goobric

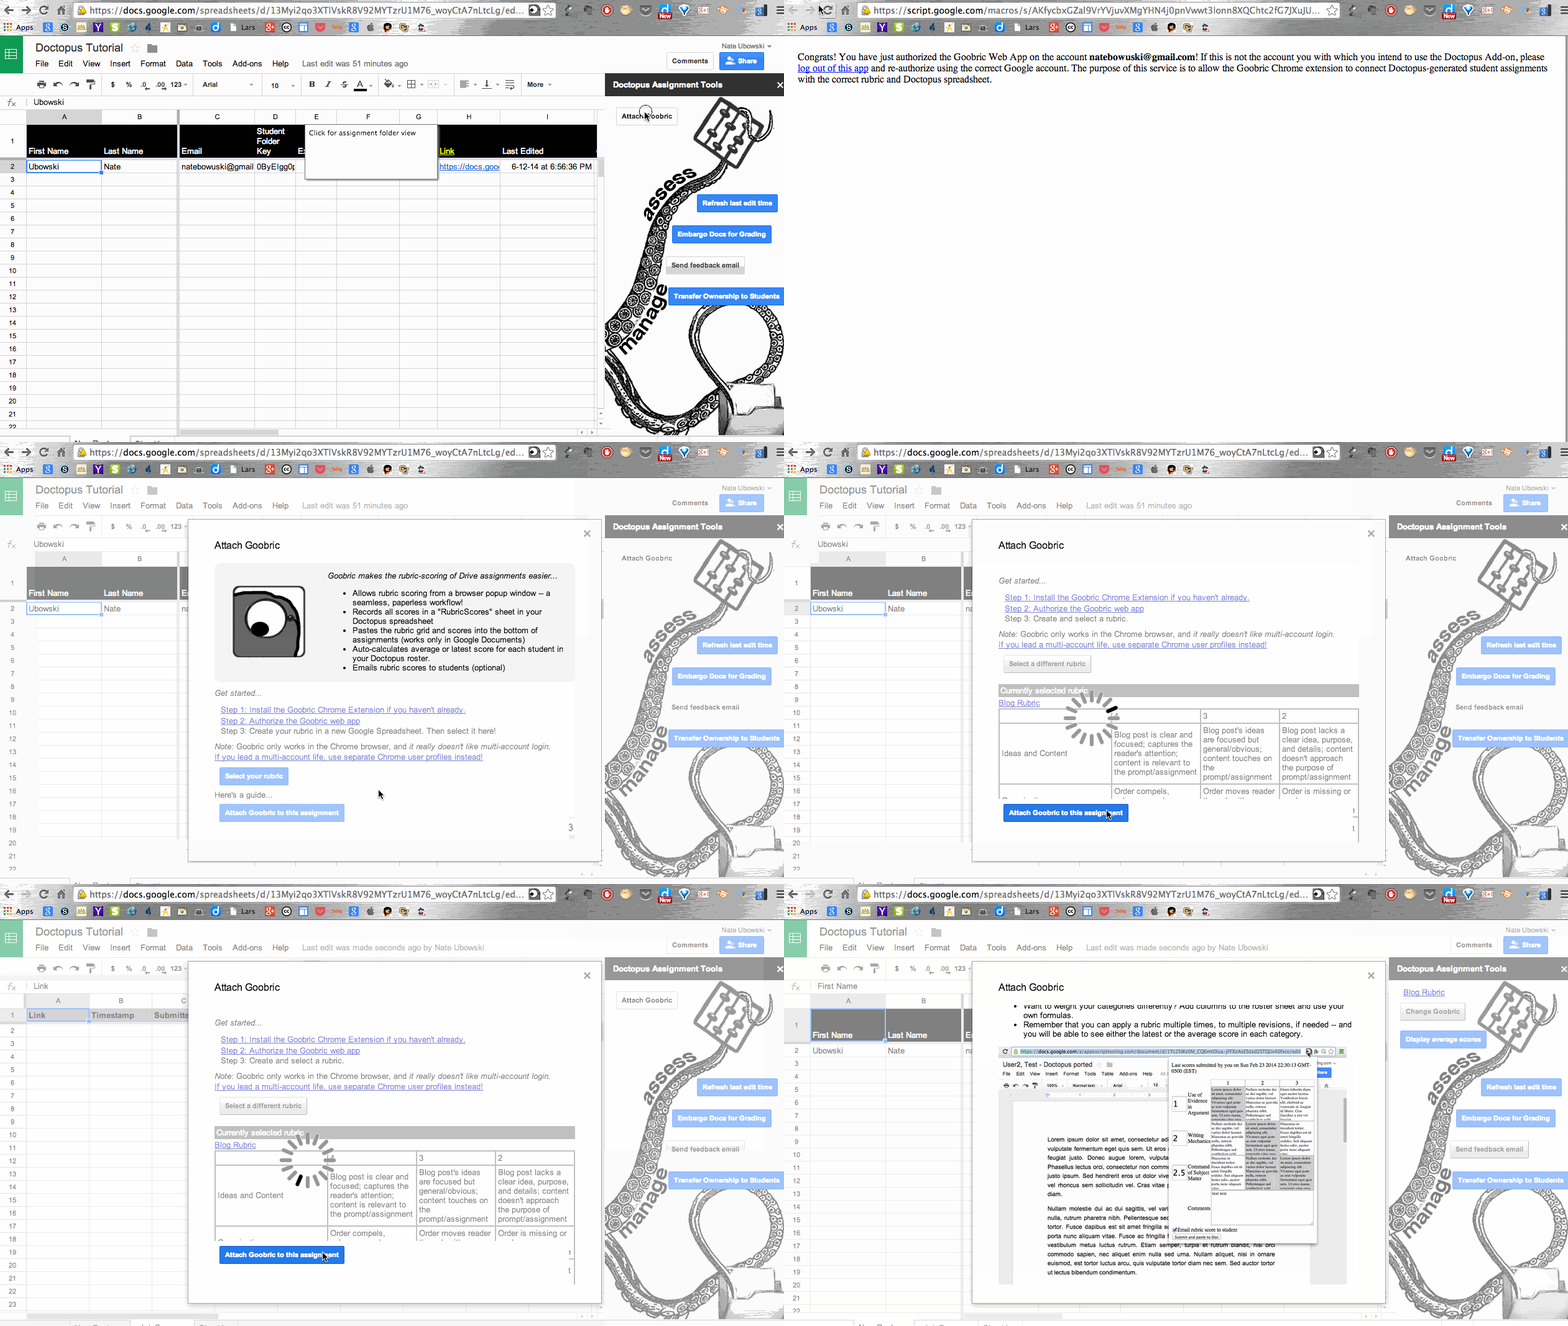
To add a Rubric to an assignment from Doctopus, run the Doctopus add-on and select “Attach Goobric” from the choices.

You will have to authorize the Goobric Web App before selecting a rubric.

Select a rubric (it will only show spreadsheets to choose from - Super handy!).


You have added a rubric to every student’s assignments from the Doctopus spreadsheet.

Grading with Goobric:


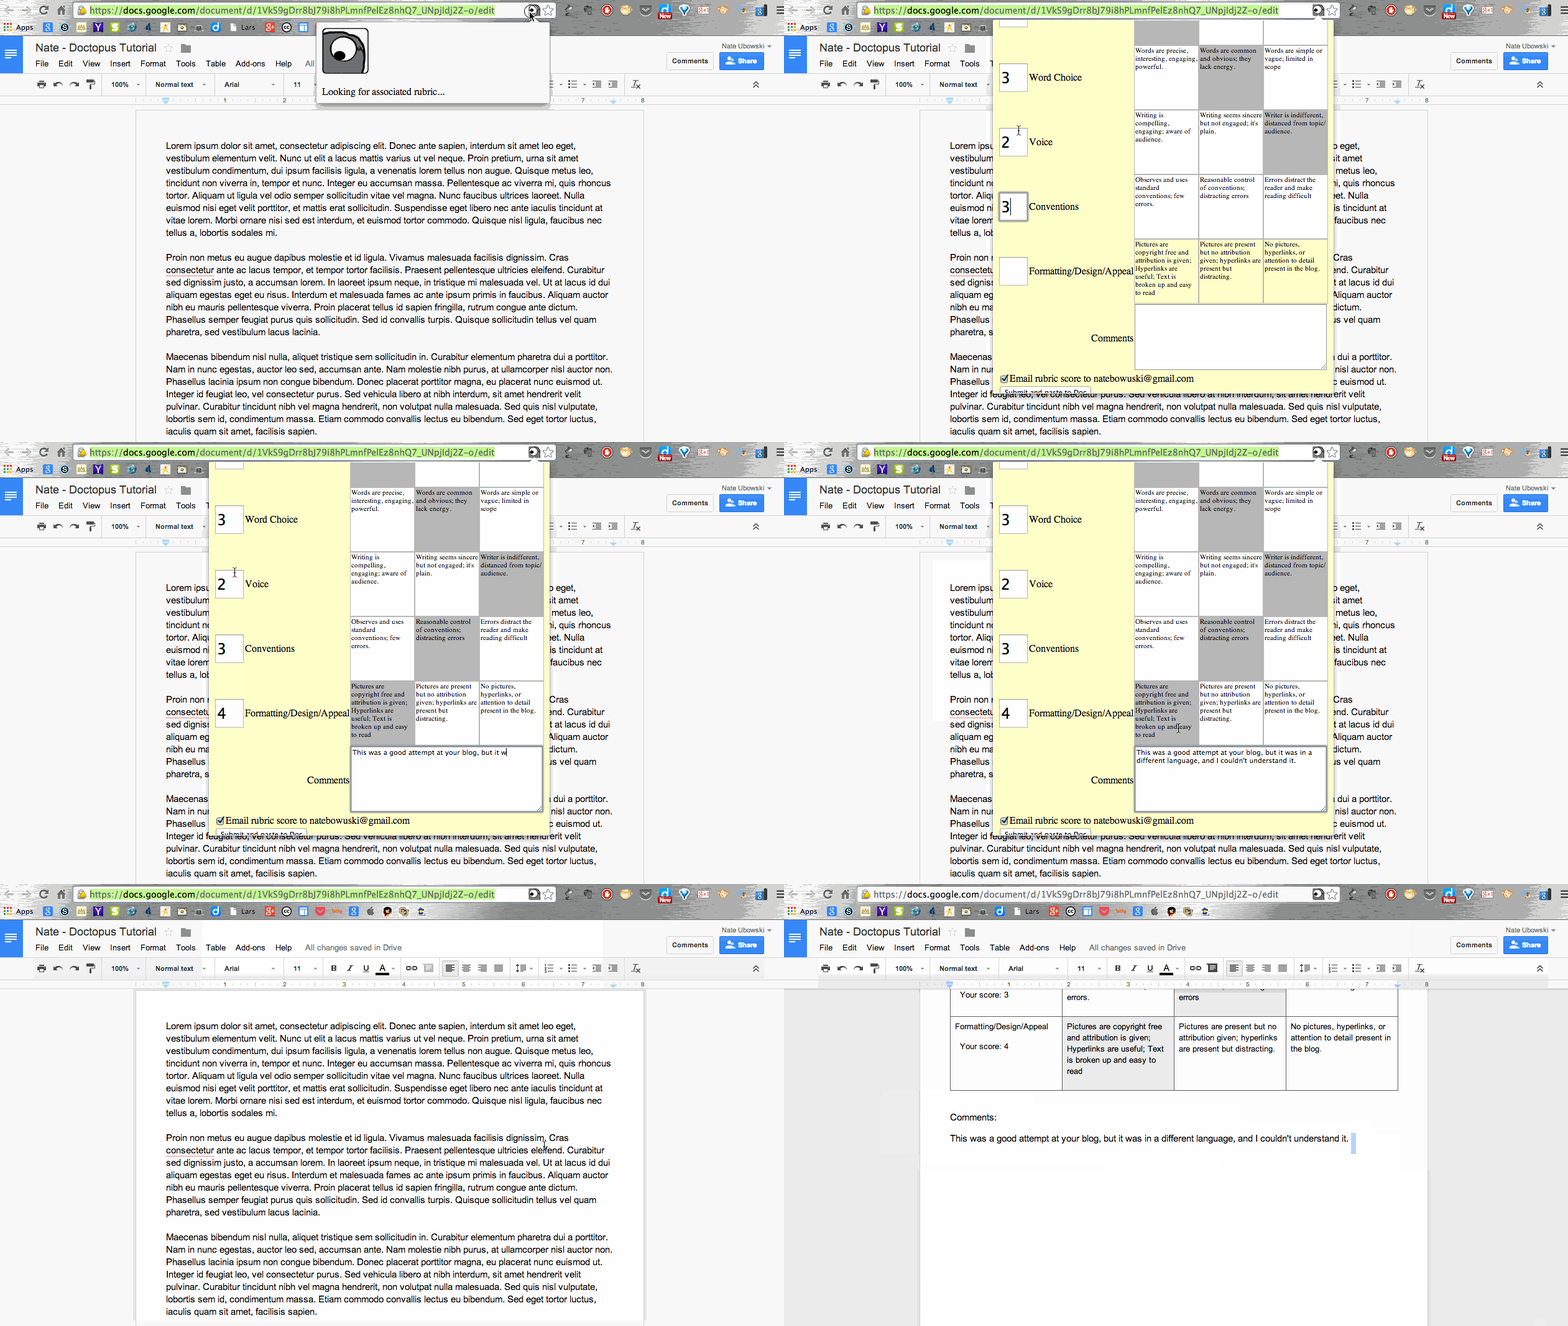
  1. Now that you have added the rubric to the documents, you are ready to grade them.
  2. Remember that one special little icon from your address bar? ⇐Yeah, that one.
  3. Go ahead and click on that icon to open up your rubric.
  4. You will have to enter the number score in order for it to register the score.


You will have the option to email the rubric directly to student to provide immediate feedback. It will send them an email with the rubric and any comments added in the comments field.

After you press submit and paste to Doc, the rubric will show up at the end of the document (All fields that were chosen will be greyed).

One downfall of Goobric is that it doesn’t automatically populate a total score based on the entered scores.


Goobric in a Doctopus Spreadsheet:


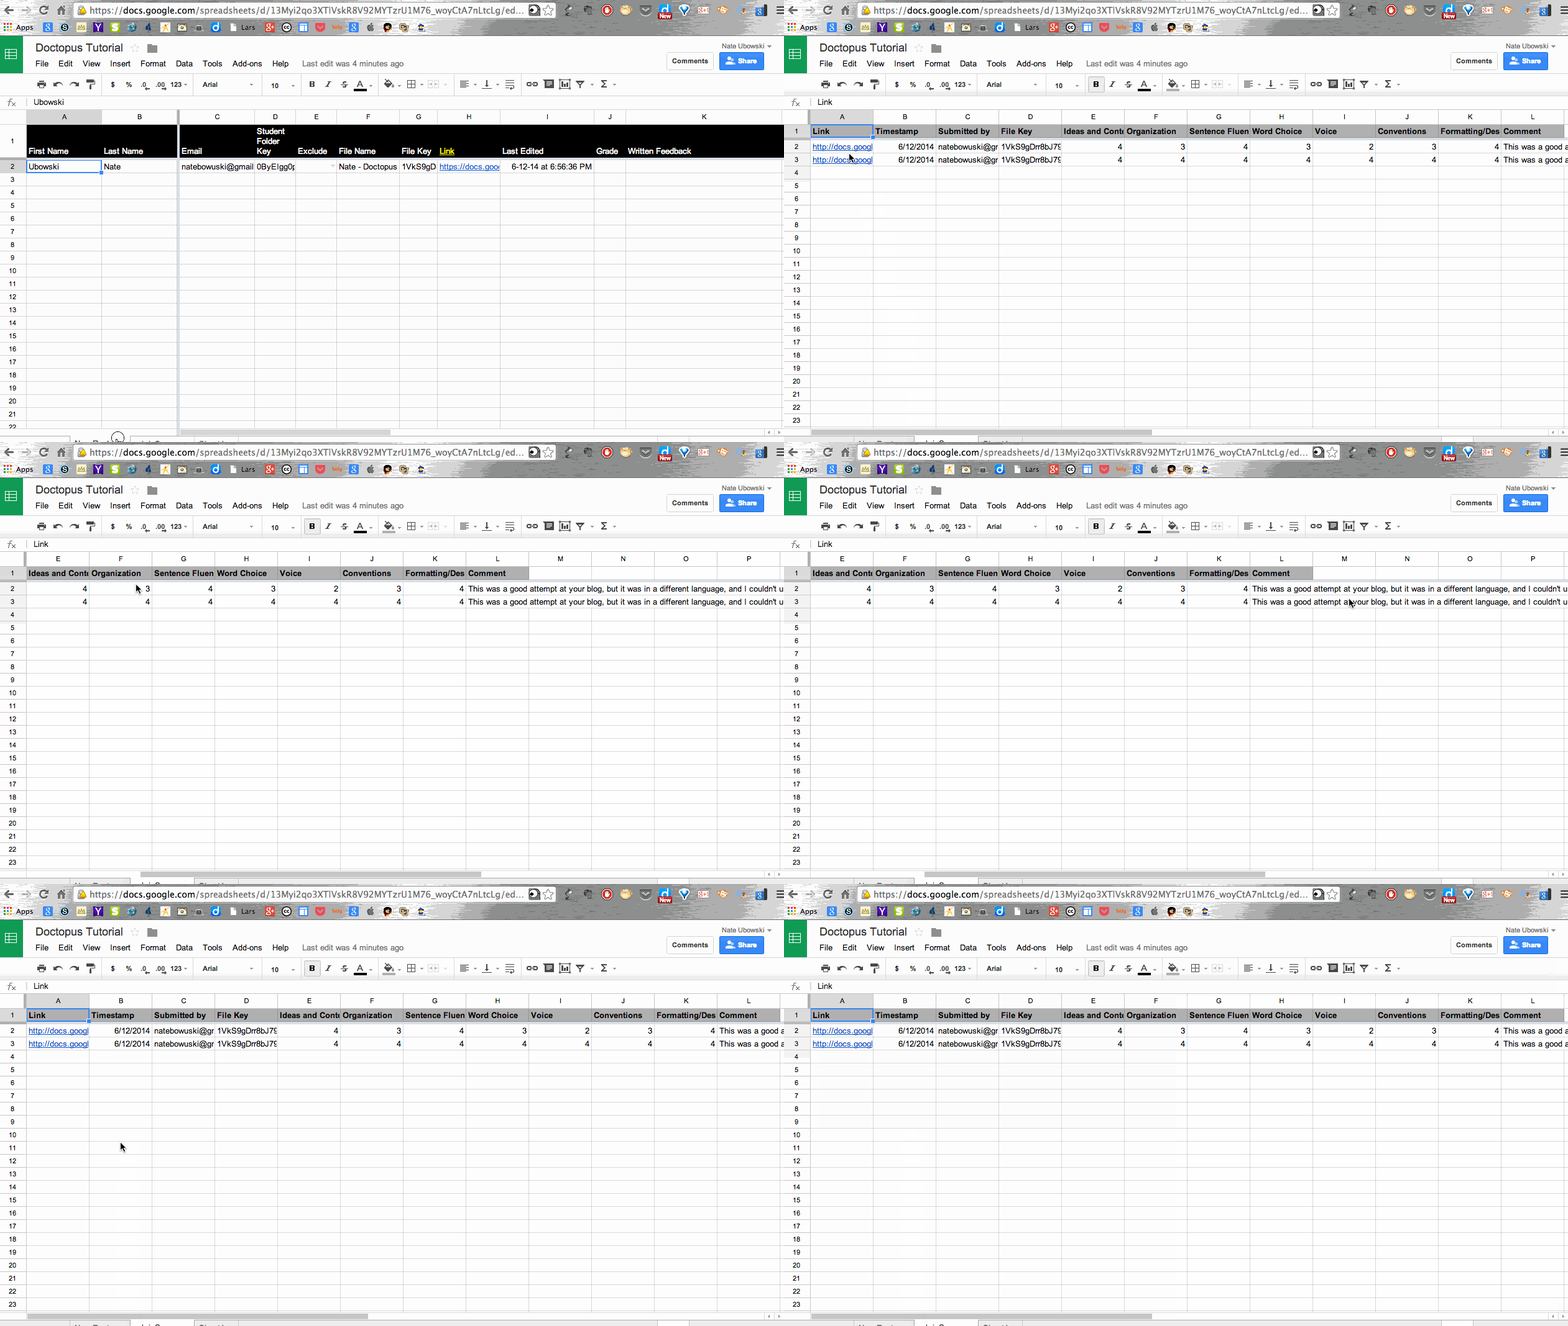
After you have added a rubric with Goobric, there is a new sheet where the scores will show up for each rubric scored.  You will be able to see the scored documents.  

The document link will normally have the title of the document, so if you name the document with the student’s last name, it is easy to see the progress of each student.


On the roster sheet, you can scroll all the way to the right to see the scores.  The names stay locked so you can always keep track of the name and scores across the same row.


That last box labeled “Count” is the number of times that the document was graded using a rubric.


Goobric Notes:


A couple things to know about using the Goobric extension:
  • When you are grading in the extension, if you click anywhere outside of the popup, your popup will disappear, but it should save what you have entered.
  • Your scores will not be saved officially until you click the submit and paste button.
  • Goobric doesn’t automatically add up or tally the score from the rubric; this is something you will have to do manually.
  • If you amend a scored rubric, it will append the document with the new version of the rubric after the old rubric.  Both will show up.  
  • When you grade using Goobric, there is a “Count” column that lets you know how many times you have graded that documents.


Saturday, August 2, 2014

Chrome Extension Review - Ruul

Ruul is an extension that acts as ruler and measuring tool for webpages in Chrome. What I love about this extension is that it allows me to measure banners, pictures, and cover photo areas so that if I am working in Google Drawings, Adobe Illustrator, Pixlr Editor, etc., I can find out the exact dimension of the area that I am want to fill with a photo or graphic. 

When you launch the extension, you have a few options to add a "ruul":
  • Resizable  - Allows you to create a box to  measure a specific area in inches, centimeters, or in pixels.
  • Add a ruler - Select one of the predesigned rulers to put on a web page.  The measurements of the ruler are in pixels.
I have used this in finding the measurements for headers on Google Sites, or cover photos in G+.  I can see the use of this in yearbook and newspaper classes when measuring out sample template ideas, in geometry classes who are blended and working a lot online through Google Docs and Drawings. 


Here's a little .gif to see the functionality:


Wednesday, July 30, 2014

Productivity with Keyboard Shortcuts (Mac OSX)

A couple months ago, I was at a conference where I was presenting with a bunch of friends. One night as we were putting some final touches on one of our sessions, my friend Chris, was basically in awe at how I was working on my Macbook.  To paraphrase his awe: "I sold Apple computers at the Apple store and I didn't even know you could do that."

Since that night, if the question comes up about a keyboard shortcut for something, I'm their go to person.

Here are some of the keyboard shortcuts that I use on a regular basis to keep the work flow smooth. Many of these will transfer over to Windows or Chromebooks by using the Control button instead of Command (⌘).

Google Chrome:

Command(⌘)-L - Take control and highlight all text in the Omnibox (address bar)
  • Great for quickly going to new addresses or starting new searches without clicking on the mouse
Command(⌘)-T - Open a new tab in Chrome
  • Extension of this, hold command as you click a link to open the link in a new tab
⌘-Shift-T - Open the previously closed tab
  • This also will continue working for a while as it will keep opening previously closed tabs
⌘-`(~) - Switch between open windows of a program
  • This is great for running multiple user accounts in Chrome and quickly switching between the user windows
⌘-D - Bookmark the address that you are currently viewing

⌘-Number Keys - Go to that number tab open in the window (1-9)

⌘-opt-shift-v - Paste and match destination formatting
  • Great for pasting into Google Docs from another site where the font is different

Bonus Google Chrome:

Some individual Chrome extensions allow the ability to assign keyboard shortcuts to launch an extension or perform a function.  Example: with Evernote WebClipper, pressing `(~) will launch the web clipper extension.

Mac OSx

⌘-Spacebar - Go to Spotlight Search bar 
  • Once again, launch an application by doing the shortcut and starting to type the application name and press enter...no cursor or mouse clicking.
⌘-shift-3 - Take a screenshot of the whole screen

⌘-shift-4 - Take a screenshot after cropping/capturing a certain area

⌘-shift-4 then Spacebar - Take a screenshot of a certain window (the cursor turns into a camera)
  • Even more options for this as well: Click on a menu option in the window, do the shortcut, and take a picture of just the drop down menu
⌘-Tab - Switch between open application on your computer - continuously press the tab button while holding down the ⌘ button and you can keep moving through your applications

⌘-option-Esc - Force Quit - if an application has stopped responding, hit the shortcut and select the app to close


This is the bulk of them for now, but I have some good shortcuts for using the trackpad on a MacBook Pro or Magic Trackpad and some reminders of the shortcuts in Google Apps. 


Shift Button Magic: Drawings

The Secret of the Shift Button:


In Google Drawings, you can resize a shape, text box, or image fairly easily. Just use the points on the outside of the bounding box to resize the object in whatever way you want.  However, if you'd like to keep the item in scale, you can press the shift button while resizing with the corner points. This also works across into Docs and Slides when you are working with text boxes. 


Also, if you are rather OCD like myself, you hate drawing a line and noticing that it isn't quite parallel or perpendicular to the grid.  The shift button also allows you to draw lines that will always give you perfectly parallel line. 

Simply start drawing your line, and hold the shift button as you finish your line. You will notice that the line will only go straight across, not up or down just a little.  This will also work to resize a line, or if you drew a non-parallel line, you can hold shift and adjust it as well. 

Now let's say that you are trying to find the exact same angle every time. As you are holding the shift button and moving a line, it will automatically move in 15 degree increments. You can see my example below (I am holding down the shift button the whole time as I move the line):


Sunday, July 27, 2014

Use Drawing as Button on Site

The beauty of Google Sites is that it works seamlessly with the apps in Drive. However, when you insert a drawing, that's all you do: insert a drawing. If you want to add the functionality of linking to another page, then this is the post for you.

The best thing about using Drawings to make buttons for a site is that you can make the buttons in whatever shape, color, doodle, etc. that you want.

Something to keep in mind:  we are going to be making the drawings into .png files, so the checkered background will remain transparent, but it will save as whatever size the canvas is. If you'd like to change the size of the canvas, in the lower right hand corner of the canvas, you'll see some lines that you can drag the canvas to a size you'd like.

When I inserted these buttons on to my Google Site, I kept the canvas at the default size because I felt that it added some spacing in between the buttons that helped it not look too busy.

I am going to demonstrate using the button that I created in my previous blog post about adding shadows. And if you would like to see my finished buttons and site layout, go to www.teacherubow.com

Saving the Drawing as .png

Once you have your button created in Drawings, you need to download it as a .png file:

Once you have the .png file downloaded, now you can work on inserting into your site.

Insert button onto Site

To insert it onto your site, you first need to edit the page you are on (Click the pencil in sites, or keyboard shortcut - e)

From there you you have three options for when you insert an image:
  • Click insert image and upload
  • Click insert image and provide URL 
  • Click on drive, and choose an image in your drive. 
    • If you choose an image from your drive, you'll need to make sure that the sharing permissions are set so people can view the image, otherwise it will not show up on your site. 

Design and Sizing of Button

Now here comes the part where you decide how you want things to look. For my site, I had about 7 of the same size buttons that I wanted to link to other things.  If you are going to add more buttons, you'd probably want to change the size. But this is all up to you. 

Just click on the icon, make it a size that you'd like, and position it where you would like.

Creating an Active button with a link

Now you need to direct the button to whatever link you would like. When you click on the image, there is a button for you to change the link. That is where you need to be to redirect when a person clicks the button.

Since this button says email me, we'll create a link to send an email using the command: mailto:insertemail@gmail.com


Don't forget to save your changes in Sites. Unlike Docs, Slides, and Sheets, your changes are not automatically saved.