On the frontlines – teaching students; teaching teachers. A source for EdTech tips, tricks, and solutions.

Sunday, March 1, 2015

Mute Individual Chrome Tabs

Chrome has the ability to be customized to almost any extent you can imagine. One feature that I have always wanted was the ability to mute individual tabs. Well it seems like this is something that you can finally do (even if it's just in beta mode).

Let's set the scene:
You have students doing some free writing with a great classical piano playlist from Pandora on in the background , but you need to load a Youtube video to show after the free write.

As you load the Youtube video, you begin to do your free write with the students, but it will automatically start playing once the page is loaded. Now you may have an issue: if you forgot about the tab, the video and sound (or even worse, advertisements) start playing over that beautiful Chopin Sonata.

Enter Chrome Experiments

Go To:

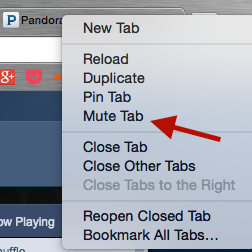
After you have enabled "Tab Audio Muting", you can now right click on any tab and mute it. 


Also, if you have a tab that is playing sound (distinguishable from the speaker icon on the tab), you can just click the speaker icon to mute the tab. 

You can preemptively mute a tab and it will remain muted until you need it to be un-muted. 

Thursday, September 11, 2014

Keyboard Shortcuts in iOS


Typing things out on a full size QWERTY keyboard is so much easier than on a smaller touch screen. You can set up easy keyboard shortcuts to type the more difficult things like email addresses which require different punctuation.


If you are frequently putting your email address into forms, emails, or log in screens, this tip can save you a lot of time.


Keyboard shortcuts are the new shorthand!


Shortcut your email address

  • Go to your settings app
  • Select General
  • Scroll down to Keyboard
  • Scroll down to Add New Shortcut...
  • Enter the phrase you want to shortcut
    •  I demo my email address
  • Enter the shortcut you want to use (I like using @@ for my primary email; @@@ for my secondary email)
  • Click save in the upper right corner

You're all good to go - keep your thumbs happy by not having to type so much! 

Tuesday, September 9, 2014

Make Goobric Count for You

I have been using Doctopus and Goobric (click link to see the walkthrough) extensively this semester already. One of the things that I was struggling with was that Goobric doesn't automatically add up the scores from a rubric so that I can easily enter the grade into a gradebook.

I was trying forever to figure this out, but then I realized how silly I was being. You can simply set up a SUM formula for the columns of the rubric so that it will automatically add up all of the elements of the graded rubric.

Create the formula:


  • Go to the column that says grade (create when you run Doctopus)
  • Goobric adds columns based on the categories of a rubric you assign to the document
  • In the grade column, enter the formula (or change based on the needs of your rubric):     
    •  =SUM (l2:r2) - I typed in each cell, just so you can see the range that this formula will do
  • Since my rubric is scored on columns l, m, n, o, p, q, r, I need to add those columns together **or however many columns you have for your rubric**
    • My rubric has 6 categories, so there are 6 cells that I am adding together
    • If your Goobric has 4 categories, your formula will look like: =SUM (l2:o2)


Even more magic:

Now, instead of entering this formula for every row (changing l2 to l3 etc.), there is a great trick to replicate that formula for every row. 

In the lower right hand corner of the cell with the grade, you have a blue box. Click the blue box and drag it down the column till the last student on your roster, and it will replicate that formula for every row. You'll see in the illustration that each row that has grades from the rubric will be added up in the grade column (J).  


This will save you time trying to add up each element of the rubric. And if you set up the formula before you grade it, your grade (sum) will show up even if you aren't in the spreadsheet. 


Wednesday, August 20, 2014

App Smash: Icebreaker Game with Socrative and Google Forms

I was looking for a way to do some ice-breaker activities with my classes. I've always loved the game "2 truths; 1 lie".  If you are unfamiliar with the game, the premise is you tell a small group of people 2 things about you that are true and one thing that false, in hopes that your group gets stumped and can't guess which one is the lie.  This would be manageable in a small group, but with 35 students it is a little different. I wanted all 35 students to participate at the same time to learn about each other. So I made it into a game show where students were responding to the student prompts using Socrative. I even chose students to be "Vanna White" to move from question to question and reveal the answers. Here's how it went down:

I collected data from Google Forms, and then imported that data as a quiz into Socrative. I ran a teacher-paced quiz to facilitate the game. Students got to choose what they thought was the lie through their phones or Chromebooks, and we would watch the live results as live  polling was happening.

Socrative User Guide

In Socrative, you have the ability to import a "quiz" from an Excel spreadsheet.

Download the Excel Template:


If you are working in Chrome, this could open up in a new tab as an editable Excel spreadsheet using Office Editing for Docs, Sheets & Slides - If this happens, you'll need to hit save now and save to your computer:
With the template that Socrative provides, you need to be working in Excel (at least for the time being. I couldn't figure out how to select the question type in box two in the online version. I will update if I figure it out). 

Here's what you should do for the Excel spreadsheet:
  1. Box 1: Rename the Quiz to whatever you want to find it as in Socrative
  2. Box 2: Question type: choose multiple choice so students get to choose from a list
  3. Box 3: this will be my first question from the form: their name
  4. Box 4: this will be the answer choices that they have to choose from, the 2 truths and 1 lie. 
  5. Box 5: You can select the right answer, but I didn't want to have that selected for my activity

Now send a Form to your students with the information you want: this is the one I used.


After you have received the data from your students submitting their work, you can copy and paste it into your Excel spreadsheet template. Put your cursor in the B7 Box and paste the data.

It will automatically go into the correct boxes across the board. The template allows for 5 answer choices. You do not need to have all 5 answer choices for this to work. I only had the three (2 truths, 1 lie) and it worked perfectly.

Now return to Socrative, and import your Excel spreadsheet. If it worked perfectly, you will see a message appear that says quiz imported successfully.

You can now return to the Socrative Dashboard and launch the quiz. The quiz will be titled whatever you put into the template as the "quiz name" in Box 1.


I ran it as a teacher-paced quiz and had students watch the results on the screen. After each student, I asked them to clarify their answers and explain which one was the lie. If they managed to trick the whole class (by majority percentage from the "quiz"), they won a prize.

Monday, August 11, 2014

Hack Google Slides

I am a big fan of being able to manipulate a page to look however I want with the use of text boxes and images. In Google Docs, the formatting of pictures is temperamental at best. I love how Google Drawings and Slides allow you to change things up, but I don't so much like how they are limited to the slide or canvas.

Here's an idea - Especially if you are looking for a Microsoft Publisher type of functionality, use Google Slides to create beautiful magazines, newsletters, or anything else your mind can think of.

Wait, your telling me that that isn't what Google Slides is for? You're right! Hack away.  Here's a demonstration:

Go to file>Page setup - then choose custom size - for today's illustration of this hack, I am going to make a standard 8.5 x 11 inch slide, so if I print it out, it fits perfectly on a piece of printer paper (but who prints things up anymore?) - If you do print, you can choose to do one slide per page and have a handout, or you can do 2 slides per page and make it a little smaller.


Now that you have your slides set up so that they are the size of pieces of paper, you can delete any of the text boxes that are showing, and design the slide any way you want.

You will see one of the slideshows that I put together for students to create a newsmagazine about themselves for the first week of school. This will allow them to go in and edit, design, and add their information to the slideshow.

How I plan on using this with my students:


  • Their homework  in the first week will be to fill in their information on the slideshow, and then they can redesign if they are interested in doing so as long as the pertinent information is present.
  • Then, we will do small group presentations at their tables to introduce themselves to their table partners.
  • Then we can do a whole class activity where the table partners share something they learned about each person

Pro-Tip Solution:

Problem: If you are using Chromebooks when it comes to presenting your magazines, if you just press present, it will show up in the middle of the screen.  The problem is that it is smaller (especially on a Chromebook) than a normal slideshow.

Solution: After you hit present in Slides, press the keyboard shortcut Ctrl-Shift-F3 and it will rotate the screen 90 degrees and your page will take up most of the screen (it will look sideways until you hold the Chromebook like an actual book). It will be much easier to read and you can even hold them up for a gallery walk or presenters display.

Custom Page Settings in Google Apps

One thing that is often overlooked in the Google Apps suite is the option available to you in the page settings menu option. This is a rundown of your options

In Google Docs:

Click File>Page settings:
  • Change the orientation of the document (Portrait or Landscape)
  • Change the page size to a preset size for different purposes (tabloid, legal, etc.)
  • Change the margins of the document
    • This one is really important to me because I prefer narrow margins on all of my docs
  • Pro-Tip - Set the page settings that you like as the default and each new doc that opens will follow that default setting!

In Google Drawings:

Click File>Page setup
  • Change the size of your canvas to preset sizes
  • Customize the size of your canvas using a custom setting:
    • This is great for creating headers, website icons, buttons, etc. 
    • You can pick whatever size you need for your project

In Google Slides:

Click File>Page Setup
  • Change the format of your screens for different projectors (4:3, 16:9, 16:10)
  • Customize the size of your slides in custom settings using Inches, centimeters, points, or pixels


Thursday, August 7, 2014

Table of Contents Add-on

For my students, I have a reading guide that is through Google Docs. As they are doing each reading assignment, they are going through the document and answering questions & learning vocabulary. When the document gets to be rather large, it takes awhile to scroll to the bottom pages just to get to the assignment.

What you could do is insert a table of contents on the top page and it will populate your headings and subheadings so that you can see it. But what happens when you are on page 20 and want to get back to the top?  The Blendastic-Bombastic Personalized PD team puts links to the table of contents in the footer so that you can easily click back to the table of contents. Brilliant idea if you ask me.

If you don't want to go through the process of navigating the links, the Table of Contents add on allows you to see the table of contents to the right of your document - at all times. It also gives the option to have the Table of Contents sidebar for anyone viewing the document.

In order for this to work, you need to make sure that you have used the heading styles as you would want them to appear on your doc.

Example:

Heading

Subheading

Minor Heading

Google docs will automatically order the table of contents assuming you have used the styles for your headings and subheadings.

When the add on window shows up, if you click on "always open for this document", the table of contents on the side will always show up for anyone viewing the document.

An example of the TOC always showing up is my Doctopus Walkthrough doc: bit.ly/doctopusaddon

Here's how it looks in a pretty little .gif: